Wrap AI Models with APIs
TL;DR: Build your own APIs for serving AI models, covering everything from basic server setup and AI model integration to authentication, database-backed user management, and rate limiting—transforming you from an API consumer to an API producer.
In the previous two modules we've seen many industry-standard API techniques and practices. Through the power of APIs we've also played with AI systems run by someone else. The problem is you are always spending money by doing so. It's time to serve your own APIs so that you turn from consumers to producers (and maybe earn some money by letting other people use your APIs).
Example: This blog site is a fully self-hosted website with basic HTTP-based APIs for handling
GETrequests from browsers. When you visit this post, your browser essentially sends aGETrequest to my server and the server responds with the HTML body for the browser to render. Knowing how to implement your own APIs enables you to do lots of cool stuff that you can control however you want!
APIs are served by API servers—a type of application that listens to API requests sent to them and produces the corresponding responses. They are like kitchens that maintain order and delivery windows for accepting and fulfilling orders, but usually keep the process of how an order is processed behind the doors. Publicly accessible APIs that you've been playing with in previous modules are nothing magic: they are served by API servers run by providers on one or more machines identified by the APIs' corresponding domains. We will compare a few choices of Python frameworks for implementing API servers, and focus on one of them to demonstrate how to implement API fundamentals you learned from previous modules in practice.
Python API Servers
Nowadays Python is the de facto language for implementing AI models. When we wrap our AI models with APIs, it would be straightforward if API servers are also implemented with Python, so that we can implement models and servers in one Python program. Thus, we will take a look at three popular Python frameworks commonly used to implement API servers: FastAPI, Django, and Flask.
FastAPI is a modern and high-performance framework used to build APIs quickly and efficiently. It is a relatively new player in Python API frameworks, but has quickly become one of the fastest-growing frameworks in Python. It has built-in support for essential components of APIs such as authentication and input validation. FastAPI is also suitable for implementing high-performing API servers thanks to its asynchronous support—think of a kitchen that won't be occupied by a few orders under processing and can always take and process new requests. Below is a barebone API server implemented in FastAPI:
from fastapi import FastAPI

app = FastAPI()

@app.get("/")
def read_root():
    return {"message": "Hello, World!"}
Django is a comprehensive web framework that is designed to implement complex web applications (websites) instead of focusing on APIs. Django follows the classic MVT (Model-View-Template) design pattern of web apps, where model represents the data you want to display, typically sourced from a database; view handles incoming requests and returns the appropriate template and content based on the user's request; and template is an HTML file that defines the structure of the web page and includes logic for displaying the data. It also comes with lots of built-in modules for building web apps, such as database connectors and authentication. Below is a minimal Django implementation.
# urls.py
from django.urls import path
from . import views

urlpatterns = [
    path('', views.hello_world, name='hello_world'),
]

# views.py
from django.http import JsonResponse

def hello_world(request):
    return JsonResponse({"message": "Hello, World!"})
Flask is a web framework similar to Django, but it is designed to be lightweight and modular. Its built-in functionalities are basic, but it can be extended through additional packages and is suitable for implementing smaller-scale applications or prototyping. It is also usually considered the least performant among the three frameworks, due to its lack of asynchronous support. Below is a barebone implementation with Flask.
from flask import Flask, jsonify

app = Flask(__name__)

@app.route('/')
def hello_world():
    return jsonify({"message": "Hello, World!"})
The three examples above can all achieve similar results—implement an API server that takes GET requests and returns a hello-world message. You can tell that comparatively the implementation with FastAPI and Flask is simpler than that with Django. We will use FastAPI as the primary example for demonstrating how to build your own API servers in the following content.
Videos:
FastAPI Fundamentals
We will start with implementing an API server with essential functionalities: accept requests to specific routes (specified by the URL) with GET and POST methods.
Basic Setup
We will need both fastapi and uvicorn packages, where uvicorn is what we call a server worker. Essentially fastapi primarily handles the definition of the server, and uvicorn actually does the API serving heavy-lifting. Extending the above example, we can start from a minimal implementation, but this time with some customization so it feels more like our own:
# main.py
from fastapi import FastAPI
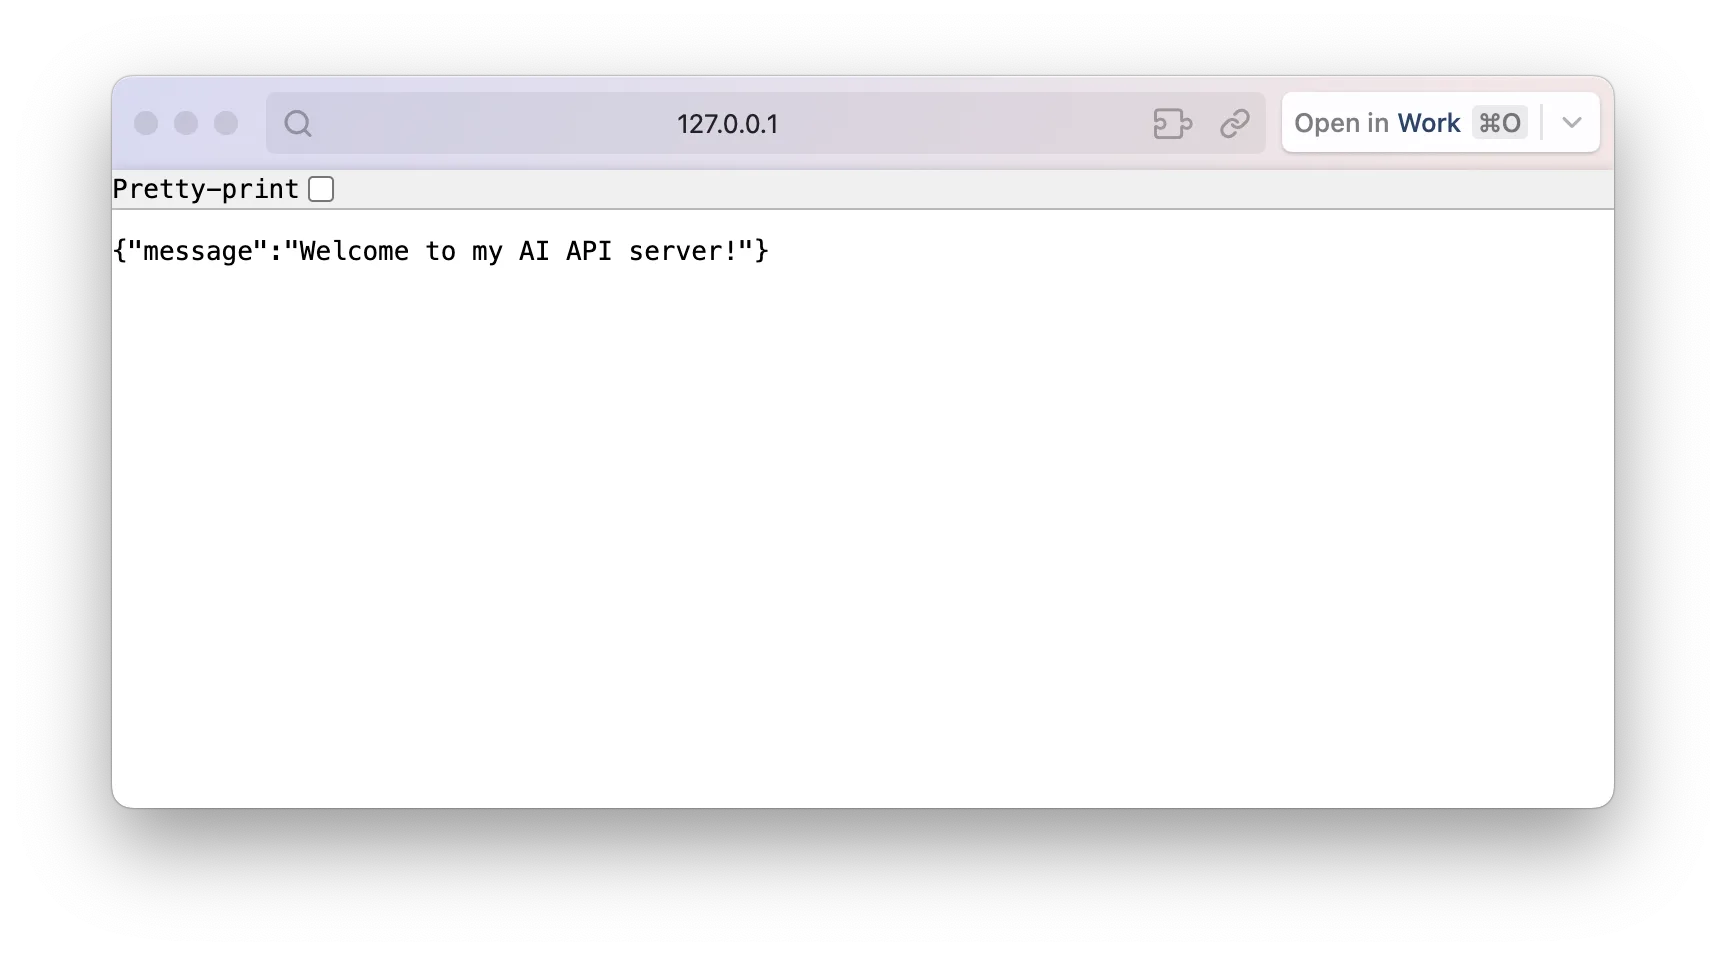
app = FastAPI(title="My AI API Server", version="1.0.0")
@app.get("/")
def read_root():
return {"message": "Welcome to my AI API server!"}And to start our server, run:
uvicorn main:app --reload --host 127.0.0.1 --port 8000Where main:app points to the app object we implemented in the main program. --reload tells the server to automatically restart itself after we modify main.py for ease of development. 127.0.0.1 is the IP of "localhost"—the computer we run the server on, and --host 127.0.0.1 means the server will only accept requests sent from the same computer. 8000 is the port our server listens on, in other words, the port used to identify our server application. You can now try to send a GET request to http://127.0.0.1:8000 with another Python application and the requests library, or by accessing the URL in your browser, and you should be able to see the message.
You will also be able to see the log messages from your server:
INFO:     Uvicorn running on http://127.0.0.1:8000 (Press CTRL+C to quit)
INFO:     Started reloader process [52851] using StatReload
INFO:     Started server process [52853]
INFO:     Waiting for application startup.
INFO:     Application startup complete.
INFO:     127.0.0.1:56835 - "GET / HTTP/1.1" 200 OK
Showing that a GET request from 127.0.0.1:56835 (location of the client application you used to send the request, the port you see might be different) for the route / is responded with 200 OK. Now try editing main.py and you will see the reload functionality working:
WARNING:  StatReload detected changes in 'main.py'. Reloading...
INFO:     Shutting down
INFO:     Waiting for application shutdown.
INFO:     Application shutdown complete.
INFO:     Finished server process [54804]
INFO:     Started server process [54811]
INFO:     Waiting for application startup.
INFO:     Application startup complete.
Routes and URL Variables
Remember the OpenAI and Anthropic APIs you've played with? They have lots of routes under the same domain, for example api.openai.com/v1/responses and api.openai.com/v1/chat/completions. You can also easily define specific routes in FastAPI using the @app.get decorator's parameter. For example, in main.py we add another route:
@app.get("/secret")
def get_secret():
    return {"message": "You find my secret!"}
And you will get the corresponding responses from / and /secret routes by accessing http://127.0.0.1:8000 and http://127.0.0.1:8000/secret, respectively.
There are also occasions you want users to pass variables through URLs. For example YouTube channels' URLs are given as https://www.youtube.com/@DigitalFoundry or https://www.youtube.com/channel/UCm22FAXZMw1BaWeFszZxUKw. Implementing a separate route for each unique variable is clearly not practical. Luckily you have two ways to pass and parse variables in FastAPI's routes. One is through URL template:
@app.get("/parrot/{message}")
def repeat_message(message: str):
    return {"message": message}
Try accessing http://127.0.0.1:8000/parrot/ + any message. You can mix multiple fixed paths and variables in one route, for example:
@app.get("/parrot/{message}-{date}/secret/{user}")
def repeat_message(message: str, user: int, date: str):
    return {"message": f"A secret message {message} sent by user {user} on {date}."}
# Try access http://localhost:8000/parrot/random-July26/secret/21
Another way is through URL parameters. These are variables specified following ? at the end of URLs with format <key>=<value> for each variable, and can be &-separated for specifying multiple variables. For example, https://www.youtube.com/watch?v=5tdsZwlWXAc&t=2s. In FastAPI, URL parameters are caught by function parameters that are not covered by URL templates:
@app.get("/secret")
def get_secret(user: int = 0):
    return {"message": f"User {user} find my secret!"}
Try accessing http://127.0.0.1:8000/secret?user=2. Needless to say, you can mix the above two approaches in one route.
Note: Strictly speaking URL parameters are part of URL templates, and URL templates can go quite complicated. But in practice following REST principles, you should keep your served URLs intuitive and straightforward.
Handle POST Requests
You've noticed that the routes we implemented above can only handle GET requests. To handle POST requests we will have to additionally read the incoming data (request body). Since incoming and response data are often more complicated and structured for POST routes, it's also worth bringing up pydantic for building data models and integrating into our FastAPI server.
Let's say you expect user to send a request body with following format:
{
    "message": "This is a very secret message!",
    "date": "2025-07-30",
    "user": 20
}
You can, technically, simply use an @app.post decorated function and catch the request body as a plain Python dict:
@app.post("/receiver")
def receiver(data: dict):
    user = data['user']
    message = data['message']
    date = data['date']
    return {"message": f"User {user} send a secret message '{message}' on {date}."}
The problem is, you cannot ensure that the data sent by users actually complies with the data type you want. For example, a request body with user as a string will also be accepted by the above route, but can cause problems in later processing. Manually implementing type checks can be tedious.
Fortunately, FastAPI can incorporate pydantic, a data validation library to abstract data models and perform automatic type checking. Extending the above example, we first define a data class and require the request body to follow the definition:
from pydantic import BaseModel

class ReceivedData(BaseModel):
    user: int
    message: str
    date: str

@app.post("/receiver")
def receiver(data: ReceivedData):
    user = data.user
    message = data.message
    date = data.date
    return {"message": f"User {user} sent a secret message '{message}' on {date}."}
Now if the request body contains invalid data types, FastAPI will reject the request and return 422 Unprocessable Content.
Videos:
API Versioning
As we covered in Advanced APIs in the Era of AI, API versioning allows you to introduce changes without breaking existing integrations. This is particularly important for AI APIs where models and features are constantly evolving. FastAPI makes implementing URL path versioning straightforward using APIRouter with prefixes.
from fastapi import APIRouter
from datetime import datetime

v1_router = APIRouter(prefix="/v1")
v2_router = APIRouter(prefix="/v2")

@v1_router.post("/receiver")
def receiver_v1(data: ReceivedData):
    return {"message": f"User {data.user} sent '{data.message}' on {data.date}"}

@v2_router.post("/receiver")
def receiver_v2(data: ReceivedData):
    return {
        "message": f"User {data.user} sent '{data.message}' on {data.date}",
        "version": "2.0",
        "timestamp": datetime.now().isoformat()
    }

app.include_router(v1_router)
app.include_router(v2_router)
Now your API supports both versions simultaneously: users can access /v1/receiver for the original functionality while /v2/receiver provides enhanced features.
Extended Reading: Examples of implementing advanced API techniques introduced in Advanced APIs in the Era of AI with FastAPI:
Build APIs for AI Models
With the foundation of basic implementation of FastAPI servers, we proceed to integrate AI models and implement AI API servers. We will build an API server with image classification APIs as an example.
Barebone Implementation
First and foremost we need a image classification model to support the AI pipeline of our API server. You might already have a model implemented in previous or parallel courses lying around. For demonstration purpose here we will use an off-the-shelf model from HuggingFace.
import asyncio
from PIL import Image
import torch
from transformers import pipeline, AutoImageProcessor, AutoModelForImageClassification

class ImageClassifier:
    def __init__(self):
        self.model = None
        self.processor = None
        self.model_name = "microsoft/resnet-18"

    async def load_model(self):
        """Load the image classification model asynchronously"""
        if self.model is None:
            print(f"Loading model: {self.model_name}")
            self.model = AutoModelForImageClassification.from_pretrained(self.model_name)
            self.processor = AutoImageProcessor.from_pretrained(self.model_name)
            print("Model loaded successfully")

    async def classify_image(self, image: Image.Image) -> dict:
        """Classify a single image"""
        if self.model is None:
            await self.load_model()

        # Process image
        inputs = self.processor(image, return_tensors="pt")

        # Run inference
        with torch.no_grad():
            outputs = self.model(**inputs)
            predictions = torch.nn.functional.softmax(outputs.logits[0], dim=0)

        # Get top 5 predictions
        top_predictions = torch.topk(predictions, 5)

        results = []
        for score, idx in zip(top_predictions.values, top_predictions.indices):
            label = self.model.config.id2label[idx.item()]
            confidence = score.item()
            results.append({
                "label": label,
                "confidence": round(confidence, 4)
            })

        return {
            "predictions": results,
            "model": self.model_name
        }
We are using a very lightweight image classification model microsoft/resnet-18 that should be able to run on most PCs. Notice the async declaration on model loading and inference functions. It is there to make sure that when your server is loading the model or processing an incoming image, the server is still able to process other requests. Think of the server always assign a dedicated person (thread) to handle a incoming request, so that if it receives another request during the process, it can assign another person rather than waiting the previous person to finish their job.
Define the server app that will load the model when startup.
from fastapi import FastAPI, HTTPException
from contextlib import asynccontextmanager

# Initialize classifier
classifier = ImageClassifier()

@asynccontextmanager
async def lifespan(app: FastAPI):
    # Startup
    await classifier.load_model()
    yield

app = FastAPI(title="AI Image Classification API", version="1.0.0", lifespan=lifespan)
We also define a few data models for the incoming request and responses, and a utility function for reading image data. Note that we use base64-encoded images so that the request body is JSON as we familiar with.
import base64
import io
from typing import List, Optional
from pydantic import BaseModel

class ImageRequest(BaseModel):
    image: str  # base64 encoded image
    filename: Optional[str] = None

class ClassificationResponse(BaseModel):
    predictions: List[dict]
    model: str

class ModelInfo(BaseModel):
    name: str
    status: str
    num_labels: Optional[int] = None

def decode_base64_image(base64_string: str) -> Image.Image:
    """Decode base64 string to PIL Image"""
    try:
        # Remove data URL prefix if present
        if base64_string.startswith('data:image'):
            base64_string = base64_string.split(',')[1]

        # Decode base64
        image_data = base64.b64decode(base64_string)
        image = Image.open(io.BytesIO(image_data)).convert("RGB")
        return image
    except Exception as e:
        raise HTTPException(status_code=400, detail=f"Invalid base64 image: {str(e)}")
Finally, we implement two routes for users to fetch information about the model, and to perform image classification.
@app.get("/model/info", response_model=ModelInfo)
async def model_info():
    """Get model information"""
    if classifier.model is None:
        return ModelInfo(
            name=classifier.model_name,
            status="not_loaded"
        )

    return ModelInfo(
        name=classifier.model_name,
        status="loaded",
        num_labels=len(classifier.model.config.id2label)
    )

@app.post("/classify", response_model=ClassificationResponse)
async def classify_image(request: ImageRequest):
    """Classify a single base64 encoded image"""
    try:
        # Decode base64 image
        image = decode_base64_image(request.image)

        # Classify image
        result = await classifier.classify_image(image)

        return ClassificationResponse(**result)

    except HTTPException:
        raise
    except Exception as e:
        raise HTTPException(status_code=500, detail=f"Error processing image: {str(e)}")
Now you have a little image classification API server! I sent it a picture of Spanish-style seafood casserole I made yesterday (it's delicious, by the way) by encoding the image to base64 format.
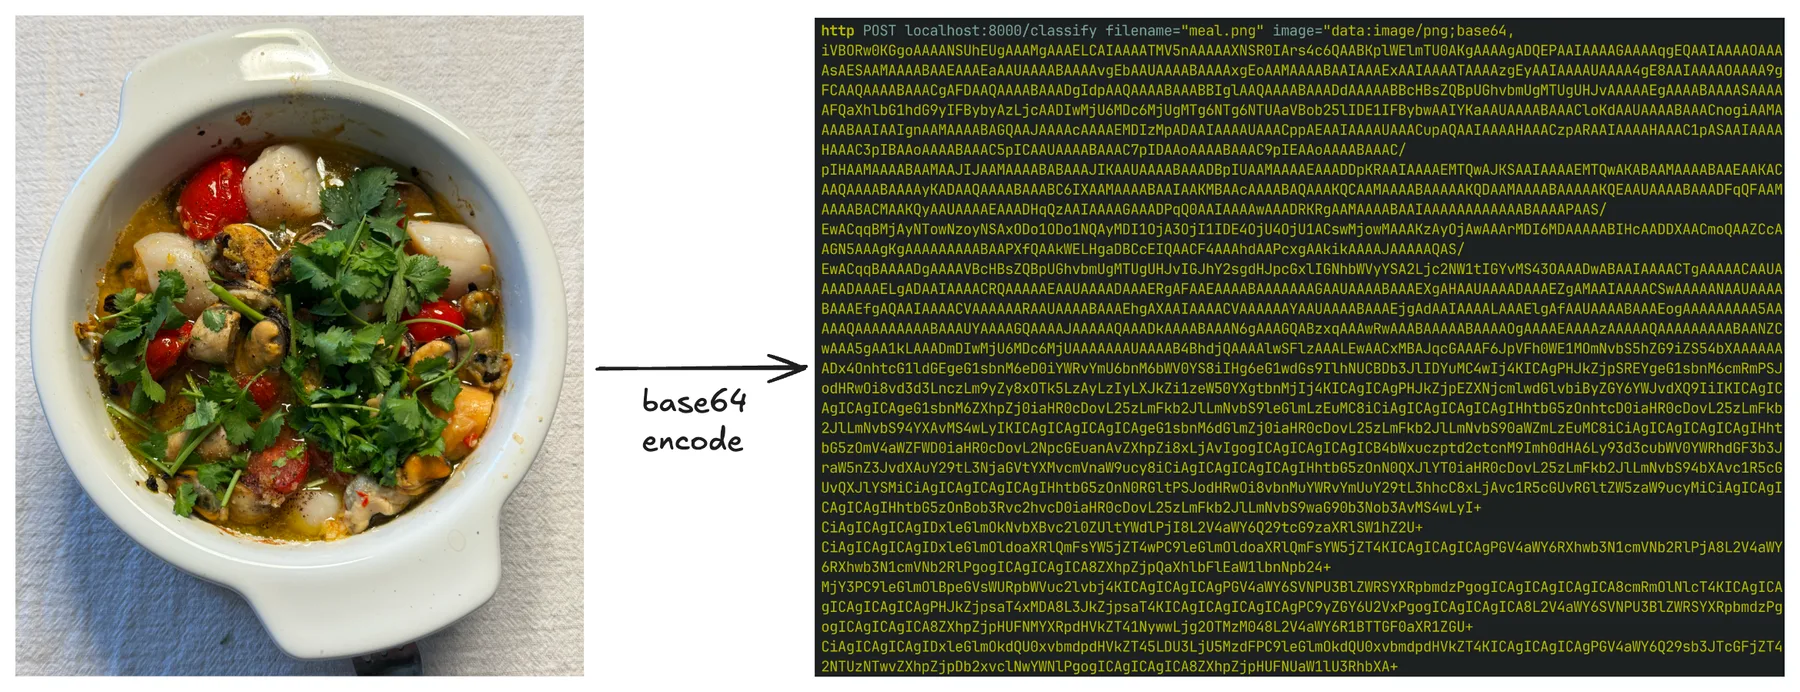
And I got the classification result from the server:
{
    "model": "microsoft/resnet-18",
    "predictions": [
        {
            "confidence": 0.5749,
            "label": "soup bowl"
        },
        {
            "confidence": 0.2213,
            "label": "consomme"
        },
        {
            "confidence": 0.1637,
            "label": "hot pot, hotpot"
        },
        {
            "confidence": 0.0107,
            "label": "mortar"
        },
        {
            "confidence": 0.0097,
            "label": "potpie"
        }
    ]
}
API Key Authentication
Right now our API server is unprotected and anyone that can access your PC can send requests and overload your delicate PC, while you also have no idea who are doing so. That's why most APIs are protected with authentication (typically API keys), and we should also implement a similar system.
FastAPI has built-in authentication support, and to implement a basic API key authentication, we can use a verification function:
from fastapi import Depends, HTTPException, status
from fastapi.security import HTTPBearer, HTTPAuthorizationCredentials

security = HTTPBearer()

async def verify_api_key(credentials: HTTPAuthorizationCredentials = Depends(security)):
    # API key validation logic
    if credentials.credentials != "your-secret-api-key":
        raise HTTPException(
            status_code=status.HTTP_401_UNAUTHORIZED,
            detail="Invalid API key"
        )
    return credentials.credentials
And for routes that need to be protected, we add the requirement for API keys:
@app.post("/classify", response_model=ClassificationResponse)
async def classify_image(request: ImageRequest, api_key: str = Depends(verify_api_key)):
  # Remaining code
Now only the request with authentication header Authorization:Bearer your-secret-api-key will be accepted by the classify route, otherwise it will return a 401 Unauthorized.
The limitation of the above implementation is that your API key is hardcoded. In practice you will want to have a dynamic list of API keys, one for each user, which also enables you to identify each request and keep track of the usage of users.
Database Integration
Continue on the above topic, one common practice for recording the list of API keys and their respective users and other information is through databases. In previous AI og data course we already hands-on concepts of databases and interact with databases through SQL queries. You can directly use database connectors and integrate SQL queries into your API server, but similar to the pydantic library for managing data models, we also have sqlalchemy for managing data models for databases.
sqlalchemy provides high-level interface to interact with databases so you do not have to write SQL queries yourself, but focus on the abstract definition and manipulation of data models. Similar to pydantic providing automatic type verification, sqlalchemy also provide automatic database initialization and SQL injection protection. For dynamic API key and user management and usage tracking, we have the following two data models for each user and processed API request:
from sqlalchemy import create_engine, Column, Integer, String, DateTime, Float, ForeignKey
from sqlalchemy.ext.declarative import declarative_base
from sqlalchemy.orm import sessionmaker, Session, relationship
from datetime import datetime
import time

Base = declarative_base()

class User(Base):
    __tablename__ = "users"

    id = Column(Integer, primary_key=True)
    api_key = Column(String, unique=True, nullable=False)
    email = Column(String)
    created_at = Column(DateTime, default=datetime.utcnow)

    requests = relationship("APIRequest", back_populates="user")

class APIRequest(Base):
    __tablename__ = "api_requests"

    id = Column(Integer, primary_key=True)
    user_id = Column(Integer, ForeignKey("users.id"))
    endpoint = Column(String)
    timestamp = Column(DateTime, default=datetime.utcnow)
    response_time_ms = Column(Float)
    status_code = Column(Integer)

    user = relationship("User", back_populates="requests")
Here we use SQLite as a simple database for demonstration, and the following code will create the database and tables when you start the server for the first time. You can see one of the benefits of sqlalchemy: later if you want to move to more performant databases, most of the time you just have to replace the database URL and reuse the data model, and sqlalchemy will handle the differences between databases for you.
engine = create_engine("sqlite:///ai_api.db")
SessionLocal = sessionmaker(autocommit=False, autoflush=False, bind=engine)
Base.metadata.create_all(bind=engine)
To upgrade our API key authentication, we fetch the user using the given API key from the database:
security = HTTPBearer()

def get_db():
    db = SessionLocal()
    try:
        yield db
    finally:
        db.close()

async def get_current_user(
    credentials: HTTPAuthorizationCredentials = Depends(security),
    db: Session = Depends(get_db)
):
    user = db.query(User).filter(User.api_key == credentials.credentials).first()
    if not user:
        raise HTTPException(status_code=401, detail="Invalid API key")
    return user

@app.post("/classify", response_model=ClassificationResponse)
async def classify_image(
    request: ImageRequest,
    user: User = Depends(get_current_user),
    db: Session = Depends(get_db)
):
    # Remaining code
Videos:
API Key Identification & Tracking
Now we can identify specific users with the API keys they used, we can also track their usage of our API server. Utilizing the APIRequest data model we defined earlier, we update our /classify route with additional recording of each request:
@app.post("/classify", response_model=ClassificationResponse)
async def classify_image(
    request: ImageRequest,
    user: User = Depends(get_current_user),
    db: Session = Depends(get_db)
):
    """Classify a single base64 encoded image"""
    start_time = time.time()

    try:
        # Classify image (your existing logic)
        image = decode_base64_image(request.image)
        result = await classifier.classify_image(image)

        # Log request
        api_request = APIRequest(
            user_id=user.id,
            endpoint="/classify",
            response_time_ms=(time.time() - start_time) * 1000,
            status_code=200
        )
        db.add(api_request)
        db.commit()

        return ClassificationResponse(**result)

    except Exception as e:
        # Log failed request
        api_request = APIRequest(
            user_id=user.id,
            endpoint="/classify",
            response_time_ms=(time.time() - start_time) * 1000,
            status_code=500
        )
        db.add(api_request)
        db.commit()
        raise HTTPException(status_code=500, detail=str(e))
Now whenever users send requests to our server, records will be stored into the api_requests table of our database:
1|1|/classify|2025-07-27 12:16:27.610650|21.8780040740967|200
2|1|/classify|2025-07-27 12:24:43.704042|22.1047401428223|200
3|1|/classify|2025-07-27 12:24:46.572790|16.6518688201904|200
4|1|/classify|2025-07-27 12:24:48.011679|16.9012546539307|200
5|1|/classify|2025-07-27 12:24:48.978239|16.8101787567139|200
We can also create a route for users to check their own usage status.
@app.get("/usage")
async def get_usage(
    user: User = Depends(get_current_user),
    db: Session = Depends(get_db)
):
    requests = db.query(APIRequest).filter(APIRequest.user_id == user.id).all()

    total = len(requests)
    successful = len([r for r in requests if r.status_code == 200])
    avg_time = sum(r.response_time_ms for r in requests) / total if total > 0 else 0

    return {
        "total_requests": total,
        "successful_requests": successful,
        "success_rate": round(successful / total * 100, 2) if total > 0 else 0,
        "avg_response_time_ms": round(avg_time, 2)
    }
Users can send a GET request to this route with their API keys and get a report of their usage:
{
    "avg_response_time_ms": 18.87,
    "success_rate": 100.0,
    "successful_requests": 5,
    "total_requests": 5
}
Rate Limiting
With API key-based user tracking in place, we can now implement rate limiting for each user to prevent bad actors from overloading our API server. Below is a simple DIY implementation that limits each user to sending 5 requests per minute, a measurement following the "sliding window" approach we introduced in Advanced APIs in the Era of AI.
from datetime import datetime, timedelta

async def check_rate_limit(user: User, db: Session):
    """Check if user has exceeded their rate limits"""
    now = datetime.utcnow()

    # Check requests in the last minute
    minute_ago = now - timedelta(minutes=1)
    recent_requests = db.query(APIRequest).filter(
        APIRequest.user_id == user.id,
        APIRequest.timestamp >= minute_ago
    ).count()

    if recent_requests >= 5:
        raise HTTPException(
            status_code=429,
            detail=f"Rate limit exceeded: 5 requests per minute"
        )
And in our /classify route, add one line of code at the start of the function:
await check_rate_limit(user, db)Now if a user sends more than 5 requests within one minute, their requests will be rejected with a 429 Too Many Requests. In practice you might also want to record users' rate limit threshold in the User data model instead of hardcoding it.
Exercise
Build an image classification API server that demonstrates knowledge covered in this module, reversing your role from API consumer to producer.
Exercise: Image Classification API Server
Develop an API server that integrates the concepts covered throughout this module:
- FastAPI Implementation: Use the FastAPI fundamentals covered in FastAPI Fundamentals, including proper route definition, request handling, and Pydantic data models
- AI Model Integration: Integrate an image classification model following the patterns shown in Build APIs for AI Models, using an appropriate open-source model that can run on your system
- API Versioning: Support API versioning using the approach shown in API Versioning
- Authentication System: Implement API key authentication as demonstrated in API Key Authentication to protect your endpoints
Client Integration:
Modify your image analysis program from API Fundamentals to connect to your server instead of third-party APIs.
Additional Functionalities (Optional):
- Database Integration: Use database integration techniques from Database Integration for user (API key) management and usage tracking.
- Rate Limiting: Apply rate limiting concepts from Rate Limiting to prevent server overload