Interacting with APIs in Python
In Module A.1 we treated APIs as something to poke at through browsers and API testing tools, which is great for getting a feel for what HTTP traffic looks like. But we don't usually ship software in the form of "open Postman and click send." Sooner or later, we want our own programs to talk to APIs on their own, especially when we want to bake AI capabilities into our applications.
In this module, we will write Python code that does exactly what we did in our API testing tool last time, plus a few more things that the testing tool cannot do.
We will start with the requests package as the basic tool for sending HTTP requests in Python, walk through sending requests and handling responses, and then look at common patterns that show up once we move beyond a playground: keeping API keys safe, sending images, and receiving streamed responses.
Getting Started with requests
Python comes with a built-in module called urllib for making HTTP requests, but its interface is somewhat clunky and verbose.
Most Python developers instead reach for a third-party package called requests, which provides a much friendlier interface and has long been the standard for HTTP in Python.
Since requests is not part of the Python standard library, we have to install it.
In a terminal, run:
pip install requestsIf you are not familiar with managing Python packages, it is a good idea to install
requestsand other third-party packages we will use later inside a virtual environment, instead of polluting your system Python. Otherwise tracking down version conflicts later becomes a nightmare.
AI providers like OpenAI and Anthropic publish their own Python packages that wrap their APIs into clean Python classes.
Wouldn't it be easier to just pip install openai and never worry about HTTP?
The answer is yes for shipping production code, but not for learning.
Provider SDKs hide all the HTTP details we just spent the previous module getting familiar with.
If something goes wrong, the error message will likely use the SDK's own wording instead of the HTTP terms we just learned.
Worse, switching to a different provider's SDK can feel like learning a brand new tool, even though under the hood they all use the same protocol.
Working with requests keeps the HTTP layer visible.
Once we get comfortable with how an HTTP request is shaped in Python, picking up any provider's SDK is just a matter of reading their documentation, since we already understand what the SDK is doing under the hood.
Sending HTTP Requests
Recall that an HTTP request has three parts: the request line (method, URL, protocol version), the request headers, and the request body.
The requests package gives us a function for each HTTP method (requests.get, requests.post, requests.put, etc.), and lets us pass headers and body as parameters.
The package also picks the protocol version for us, so we don't have to think about it.
Sending a GET Request
We will start with a GET request to the OpenAI models endpoint, which returns a list of models available to our account.
This is exactly the same request we sent in the previous module with our API testing tool, just this time from Python:
import requests

url = "https://api.openai.com/v1/models"

headers = {
    "Authorization": "Bearer sk-abc1234567890qwerty",
    "Accept": "application/json",
    "User-Agent": "SomeAIApp/1.0",
}

response = requests.get(url, headers=headers)
print(response.status_code)
print(response.json())
Let's break down each component and see how it maps back to the HTTP concepts from the previous module.
The url string corresponds to the URL part of the request line.
requests.get adds the GET method automatically.
The headers dictionary becomes the request headers, with each key-value pair turning into one header line in the actual HTTP request.
The Authorization header carries our API key, which for now we have written directly into the code as a string. We will revisit this shortly.
The returned response object contains all three components of the corresponding HTTP response.
We will look at it more closely in the next section.
Sending a POST Request
POST requests look almost the same, except they also carry a request body.
To ask an AI chatbot a question through the chat completions API, we send a POST request with our message inside a JSON body:
import requests

url = "https://api.openai.com/v1/chat/completions"

headers = {
    "Authorization": "Bearer sk-abc1234567890qwerty",
    "Content-Type": "application/json",
    "Accept": "application/json",
    "User-Agent": "SomeAIApp/1.0",
}

# Body fields are decided by the API provider. Check their documentation
body = {
    "model": "gpt-5.4-mini",
    "messages": [
        {"role": "user", "content": "Write a haiku about APIs."}
    ],
    "temperature": 0.7,
    "max_completion_tokens": 100,
}

# json= serializes the dict into JSON, and timeout gives up after 30 seconds
response = requests.post(url, headers=headers, json=body, timeout=30)
print(response.json())
A few things worth noting.
We pass the body as the json parameter, and requests automatically converts the Python dictionary into JSON and puts it into the request body.
We don't actually have to set the Content-Type header ourselves when using json=..., since requests sets it to application/json for us, but it is good to be explicit.
The timeout=30 parameter tells requests to give up if the server hasn't responded within 30 seconds.
AI APIs occasionally hang for unknown reasons, and without a timeout your program could wait forever.
The structure of the body (model, messages, temperature, etc.) is decided by the API provider.
For other AI services or even other endpoints of the same provider, the expected format might be totally different, and you will need to check their documentation.
Handling HTTP Responses
The response object returned by requests.get or requests.post contains all three components of an HTTP response: status line, headers, and body.
We can access each through attributes on the object.
The status code is on response.status_code:
print(response.status_code) # e.g., 200There are also shortcuts like response.ok, which is true for any status code below 400, and response.reason, which is the reason phrase like "OK" or "Not Found".
Response headers are exposed as an object that behaves like a dictionary on response.headers:
print(response.headers["Content-Type"]) # e.g., "application/json"The body can be accessed in different formats depending on what we need:
response.text     # body decoded as a string
response.content  # body as raw bytes
response.json()   # body parsed from JSON into a Python dict (assuming the body is JSON)
For most AI APIs, response.json() is what we want, since the response body is typically in JSON format.
From there we can navigate to the specific field we care about:
result = response.json()
print(result["choices"][0]["message"]["content"])
Error Handling
So far we have assumed everything goes smoothly, but in practice many things can go wrong. The network could be down, the API key could be invalid, the request body could be malformed, the AI service might be experiencing an outage, and so on. A program that crashes the moment any of these happen is not very useful.
The requests package signals failures in two ways.
Failures at the network level, like the connection being refused or timing out, raise exceptions from the requests.exceptions module.
Failures at the HTTP level, where the request reaches the server but the server responds with an error status code like 4xx or 5xx, do not raise exceptions by default.
We have to either check response.status_code ourselves or call response.raise_for_status(), which raises an HTTPError if the status code indicates failure.
Putting both together:
import requests

try:
    response = requests.post(url, headers=headers, json=body, timeout=30)
    response.raise_for_status()  # raises HTTPError for 4xx and 5xx status codes
    result = response.json()
    print(result["choices"][0]["message"]["content"])
except requests.exceptions.Timeout:
    print("The API took too long to respond.")
except requests.exceptions.HTTPError as e:
    # Server reachable but responded with an error
    print(f"The API returned an error: {e}")
    print(f"Body: {response.text}")
except requests.exceptions.RequestException as e:
    # Catch-all for network-level failures (connection refused, DNS errors, etc.)
    print(f"Request failed: {e}")
requests.exceptions.RequestException is the base class for all exceptions raised by requests, so it acts as a catch-all if we just want one branch to handle anything related to the network.
Here we catch Timeout and HTTPError separately because they often deserve different treatment.
A timeout might be worth retrying, while a 401 from a bad API key is not.
Below are some additional resources to help you get more comfortable with
requests.
- Official
requestsquickstart (docs), with a more thorough catalog of features- Real Python's deep dive on
requests(blog post), good if you want to go deeper than what we covered here- Corey Schafer's tutorial on
requests(video)If you happen to write applications in other languages, the HTTP libraries you would use look quite different on the surface but follow the same request-response pattern under the hood. A few official references for popular languages:
- JavaScript: Fetch API (docs), built into modern browsers and Node.js
- Go:
net/http(docs) in the standard library- Rust:
reqwest(docs), a popular community-maintained HTTP client
Beyond the Basics
What we have covered so far is enough to send a single request and read back a single response. But integrating AI into a real program usually involves a few more patterns we have not touched yet. This section walks through three common ones: keeping API keys out of source code, sending images to AI APIs that accept them, and receiving streamed responses.
Storing Secrets in Environment Variables
In all the code examples above, we wrote the API key directly into the source code as a string. That was fine to keep the examples short, but it is a bad idea for any real project. API keys give whoever holds them access to your account and billing, so they should be treated like passwords.
The problem with hardcoding the key is that anyone who reads the code can see it. This sounds dramatic, but it happens all the time. People commit code to public Git repositories, paste snippets into Slack, or share screenshots in tutorial videos, and end up leaking API keys without realizing it. Bots scan public GitHub commits for exactly this kind of leak, and stolen keys can be running up bills on your account within minutes.
The standard fix is to put secrets in environment variables, which are key-value pairs that the operating system makes available to programs running on it, separate from the source code. To set one in a Unix shell (Linux, macOS, or Windows under WSL):
export OPENAI_API_KEY="sk-abc1234567890qwerty"Then in Python, os.getenv("OPENAI_API_KEY") reads the value back:
import os

headers = {
    "Authorization": f"Bearer {os.getenv('OPENAI_API_KEY')}",
}
The key never appears in source code, and we can safely share or commit our work.
For projects that run longer and have several environment variables, manually exporting each one quickly gets tedious.
A common practice is to store them in a .env file at the root of the project, then load them at startup using a package like python-dotenv.
A .env file looks like this:
OPENAI_API_KEY=sk-abc1234567890qwertyand is loaded with:
from dotenv import load_dotenv
load_dotenv()
Make sure to add .env to your .gitignore so it never gets committed.
Sending Images in the Request Body
Many modern AI chatbot APIs accept images in addition to text. To send an image to such a model, we need to fit the image into a JSON body. The catch is that JSON cannot directly hold binary data like raw image bytes. The standard workaround is to encode the image into a Base64 string, which turns the binary bytes into a regular text string that fits inside JSON.
Python's standard library has a base64 module that takes care of the encoding part.
For opening and preparing the image itself, we will use Pillow, the most widely used image processing library in Python.
Pillow makes it easy to open, resize, or convert images before sending them, which is often necessary since AI providers usually set limits on image dimensions and file size.
Here is how to send a local image to OpenAI's chat completions API:
import base64
import os
import requests
from io import BytesIO
from PIL import Image

# Open the image and downscale it to fit common provider size limits
image = Image.open("cat.jpg")
image.thumbnail((1024, 1024))

# Re-encode as JPEG bytes, then Base64 those bytes into an ASCII string
buffer = BytesIO()
image.save(buffer, format="JPEG")
encoded = base64.b64encode(buffer.getvalue()).decode("utf-8")

url = "https://api.openai.com/v1/chat/completions"
headers = {
    "Authorization": f"Bearer {os.getenv('OPENAI_API_KEY')}",
    "Content-Type": "application/json",
}
body = {
    "model": "gpt-5.4-mini",
    "messages": [
        {
            "role": "user",
            # Content is now a list of parts: a text question plus the image
            "content": [
                {"type": "text", "text": "What is in this picture?"},
                {
                    "type": "image_url",
                    # The data: prefix tells the API how to interpret the bytes
                    "image_url": {"url": f"data:image/jpeg;base64,{encoded}"},
                },
            ],
        }
    ],
}

response = requests.post(url, headers=headers, json=body, timeout=60)
print(response.json()["choices"][0]["message"]["content"])
The key idea is that the entire image is now a single string inside the JSON body.
The data:image/jpeg;base64, prefix follows the data URL scheme and tells the API how to interpret the bytes that follow.
Each AI provider has its own preferred way of carrying images.
Some accept Base64 inline, some only accept URLs to publicly hosted images, and some have a separate file upload endpoint.
As always, check their documentation.
Receiving Streaming Responses with Server-Sent Events
When you chat with ChatGPT or Claude on their official web app, you might have noticed that the response appears word by word as the model generates it, instead of arriving all at once after a long pause. This streaming behavior is achievable through the same APIs, using a technique called Server-Sent Events (SSE).
SSE is built on top of HTTP. Instead of the server sending one complete response and closing the connection, it keeps the connection open and writes the response in small chunks as they become ready. This is particularly useful for AI text generation, since most modern chat models produce text one piece at a time anyway, and streaming lets users start reading before the full reply is finished. Without streaming, an answer that takes 30 seconds to generate also takes 30 seconds before the user sees anything. With streaming, the first words start appearing in a second or two.
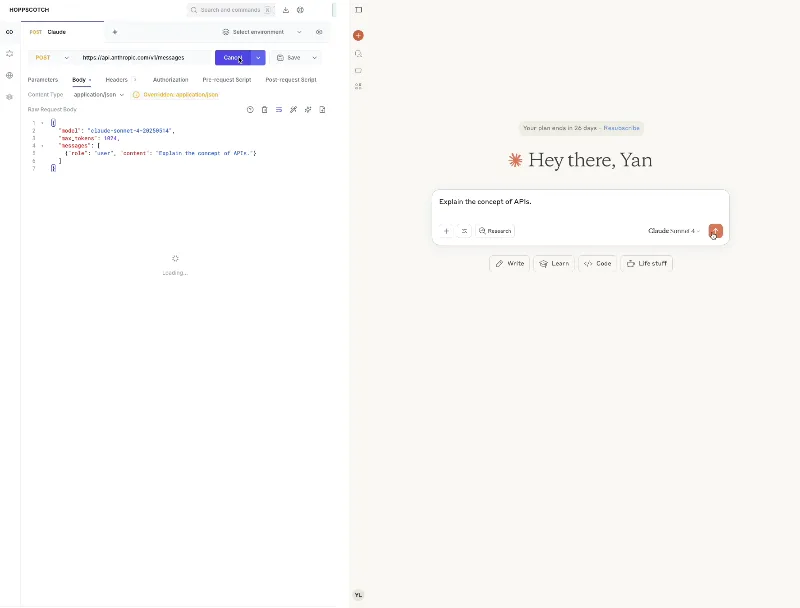
A non-streaming response (left, in an API testing tool) lands all at once after a delay, while a streaming response (right, in a typical AI chatbot app) renders word by word as the model produces it.
To enable SSE with requests, we have to do two things.
First, we tell the API we want streaming.
The exact mechanism varies by provider, but most use a stream: true field in the body.
Second, we tell requests not to buffer the response by passing stream=True.
Then we read the response chunk by chunk:
import json
import os
import requests

url = "https://api.openai.com/v1/chat/completions"
headers = {
    "Authorization": f"Bearer {os.getenv('OPENAI_API_KEY')}",
    "Content-Type": "application/json",
}
body = {
    "model": "gpt-5.4-mini",
    "messages": [{"role": "user", "content": "Explain APIs in two sentences."}],
    "stream": True,  # ask the API to stream the response
}

# stream=True keeps the response unbuffered so we can read chunks as they arrive
response = requests.post(url, headers=headers, json=body, stream=True, timeout=60)
response.raise_for_status()

for line in response.iter_lines():
    if not line:
        continue  # SSE uses blank lines to separate events
    line = line.decode("utf-8")
    if not line.startswith("data: "):
        continue  # ignore non-data lines (e.g., comments)
    payload = line[len("data: "):]
    if payload == "[DONE]":
        break  # OpenAI's signal that the stream is done
    chunk = json.loads(payload)
    delta = chunk["choices"][0]["delta"].get("content", "")
    print(delta, end="", flush=True)  # no newline so chunks merge into a single output
print()
Each chunk follows the SSE format: a line starting with data: followed by a JSON payload, with an empty line as a separator.
We pull out the JSON, extract the new piece of text, and print it without a newline so all the chunks join together as a continuous output.
The [DONE] marker is OpenAI's signal that the stream has finished.
Other providers use slightly different markers, so check their documentation.
Both OpenAI and Anthropic have detailed documentation on streaming, including the full set of event types they emit.
SSE is not the only protocol AI services use for streaming. Protocols like WebSocket and WebRTC support two-way communication and are widely used in voice and video AI features, including OpenAI's Realtime API and Google's Gemini Live. For these protocols the
requestspackage is no longer enough, and we need Python libraries specific to each protocol:
websockets(docs) for WebSocket clients and serversaiortc(docs) for WebRTC clients and servers
Exercise: A Command Line Chatbot
Build a Python program that takes a question from you, sends it to an AI API, and prints the model's reply. You can use any of the AI APIs we used in the previous module's exercise, and the program does not need to be fancy to count as done.
A rough outline of how you can implement your program:
- Read the API key from an environment variable.
- Take a question from the user, either as a command line argument or by reading one line from
stdin. - Send a
POSTrequest to the AI provider's chat API with the question as the message. - Parse the response and print the assistant's reply.
- Handle common error cases gracefully. The program should not crash when the network blips or your quota is exhausted. Print a useful message instead.
Once you have the basic version working, try the following extensions to deepen your understanding of the topics covered in this module:
- Intentionally trigger errors. Try an invalid API key, a malformed body, or unplugging your network cable in the middle of a request. Verify that each branch of your error handling actually fires, and that the messages shown to the user are useful.
- Add a
--image <path>flag that lets the user attach a local image to the question. Use Pillow and Base64 to embed the image into the message. - Replace the regular
POSTwith a streaming version that prints the assistant's reply word by word using SSE. Once it works, you should feel a noticeable difference compared to waiting for the full reply.
If you finish all the extensions, you will have written a small but real AI client that uses every concept we have covered. It is also a good base for future projects, since most AI applications are some variation of this pattern.