Packaging & Containerization
TL;DR: Ever struggled with "it works on my machine" syndrome? Learn how containers solve deployment headaches by packaging your applications with everything they need to run consistently anywhere. We'll explore Docker fundamentals and build a containerized AI API server.
Now you understand (from AI compute hardware) that most computers, from your smartphones and laptops, those overpriced "AI computers" sold in the electronic stores, to cloud servers that you can rent for a price of a car per year, adhere to the same computer architecture. It should come with no surprise that in most cases, you can install a general purpose computer operating system (Linux, Microsoft Windows, or others) on them, and use them as you would use your PC.
But before you go ahead and deploy your AI API server on all kinds of machines and dreaming about earning passive income by charging other developer using your server, we will learn techniques that will make large-scale deployment much easier.
Recall the AI API server we implemented in Wrap AI Models with APIs. You probably ran it directly on your machine, installed the required Python packages locally, and hoped everything would work a few months later. But what happens when you update your machine's operating system, or you want to deploy it on a different machine with a different operating system, or when your group members try to run it but have conflicting Python versions? Saying it (used to) work on my machine certainly doesn't help.
Are there techniques that can ensure that the runtime environment for our programs is consistent regardless of the operating system and OS-level runtime, so we can deploy our programs to any computer with the confidence that they just work? Yes, and you guessed it: packaging and containerization techniques.
The idea is, instead of trying to replicate the runtime every time we deploy our programs on a new machine (that means, install and configure everything you need depending on the type of the machine and operating system), we first pack the softwares alone with the runtime into a portable container that will always run with a single command regardless of which machine it is ran on. This process can take extra effort at first, but will save a lot of headache for later large-scale deployment.
Basics of Containers
Before we learn how do pack our softwares into a container, we first need to get familiar with a few essential concepts related to containers.
What are Containers?
A container is a lightweight package that includes everything needed to run a piece of software: the code, runtime environment, libraries, and configurations. Containers are self-contained units, meaning that they can run consistently anywhere.
Traditionally, deploying software on a machine meant installing the software itself and all its dependencies directly on the machine. Not only this can be tedious to do if you are deploying a complex software in large-scale, but can also lead to lots of problems. For example, there might be two pieces of software on the same machine that requires different versions of the same library, and an update to the operating system can break the carefully configured environment.
Containers solve this by creating isolated environments that package your application with everything it needs to run. Each container acts like a sealed box with its own filesystem, libraries, and configurations, which are completely separate from other containers and the native environment of the machine. Yet they're incredibly efficient, starting in seconds and using minimal resources.
Think of containers like this: at a traditional Chinese dinner, everyone shares dishes from the center of the table. But, what if one person needs gluten-free soy sauce while another needs regular? What if someone accidentally adds peanuts to a shared dish when another guest has allergies? Containers are like giving each person their own Western-style plated meal with exactly the seasonings and portions they need. No sharing conflicts, no contamination between dishes, and everyone gets precisely what works for them, while still sitting at the same table.

The benefits of containers quickly made containerization become the industry standard for large-scale software deployment. Today, there is a very high chance that one of the applications you use everyday is running in containers. It is reported that by 2025, container usage in the IT industry has reached 92%. With the help of containers, companies can deploy updates without downtime, handle more users by scaling automatically, and run the same software reliably across different hardware infrastructures.
Videos:
Extended Reading: For those curious about the differences between containers and virtual machines (VMs). Virtual machines create complete simulated computers, each running its own full operating system. It's like building separate restaurants for each type of cuisine, each with its own kitchen, dining room, storage, and utility systems. Containers, on the other hand, share the host's operating system kernel while maintaining isolation. This makes containers much lighter and faster to start compared to VMs. Nevertheless, VMs provide stronger isolation for certain security-critical applications, just like separate restaurants offer more complete separation for health code or dietary law compliance, so they still have their usecases.
How Containers Work?
The secret sauce of containers' efficiency and flexibility is a clever layering system.
Imagine you're building different types of hamburgers. You start with a basic bottom bun. Then you add a beef patty as the next layer. For a cheeseburger, you add a cheese layer on top. For a deluxe burger, you might add lettuce, tomato, and special sauce as additional layers. Instead of preparing everything from scratch each time, you can reuse the same foundation (bun and patty) and just add the unique toppings that make each burger special.
Similarly, each container image is a system of layers. Each layer represents a set of changes from the previous one. For example, you would have a container image with 4 layers:
1. Add Python runtime
2. Install libraries
3. Copy your application code
4. Configure the startup commands
Since containers running on one machine usually have common layers, especially the base layers such as Python runtime, containers will share the common layers so that only one copy of the layer exists. This means that duplicate layers do not have to be stored so storage space is saved. Also, an update to each container don't involve rebuilding of the whole container, just the layers that have been modified.
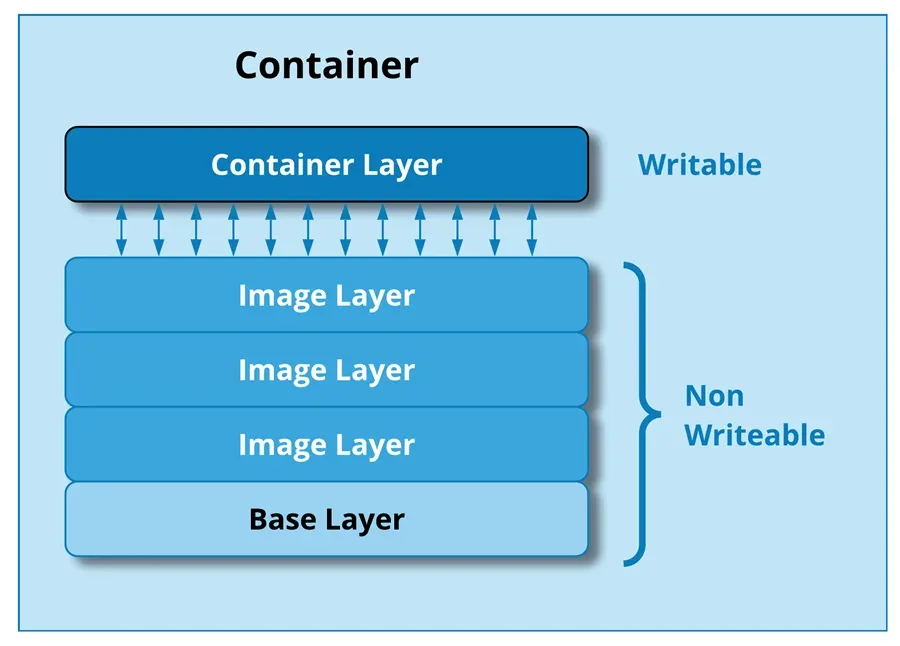
Extended Reading: When a container runs, it obviously needs to modify files in the layers, like storing temporary data. But it seems that this will break the reusability of layers. Thus, there is actually a temporary writable layer on top of the read-only layers when a container is running. All changes happen in this writable layer during the running of a container image, while the underlying layers of the image itself is untouched.
Interested in other working mechanisms of containers? When a read-only file in the image layers is modified, the container will use a "copy-on-write" strategy: copying the file to the writable layer before making changes. This is made possible with union filesystems (like OverlayFS) that merge multiple directories into a single view.
Container Frameworks
While containers as a concept have existed since the early days of Linux, it was Docker that made them accessible to most developers. Docker provides a comprehensive toolkit for working with containers, that includes:
- Docker Engine, the core runtime that manages containers running on a machine
- Docker CLI, providing commands for managing containers like
docker run - Dockerfile, a recipe for building container images that writes in plain text and corresponds to the layered system of images
- Docker Hub, a cloud registry for sharing container images
With the toolkit provided by Docker, in many cases you can quickly starting using containers without building a container image by yourself or even understand the working mechanism of containers. There is a high chance that the software you need is already available on Docker Hub, say for example the PostgreSQL database, and you can spin up a container with Docker CLI command docker run postgres. Docker will pull the already built postgres image from Docker Hub and run a container instance of the image.
If you need to build a custom image, with Dockerfile you can also easily use one of the existing image as the base image, and you only have to define the customized part of your image. We will dive into how to write Dockerfile below.
Under the hood, Docker uses a client-server architecture that separates what you interact with from what actually does the work. When you use Docker CLI, you are interacting with the Docker Client, a program that takes your commands and send the corresponding requests to the Docker Daemon. Docker Daemon is a background service that does the actual work of managing containers, like a server that runs on backend. As you would imagine, the Docker Client and the Docker Daemon don't necessarily have to run on the same machine, a common relationship between clients and servers.
Videos:
Extended Reading: There are alternative container frameworks to Docker, such as:
- Podman that runs without a background daemon. This can provide better security. It also provides nearly identical CLI commands to Docker, so it is a drop-in replacement in most cases
- containerd, which is what Docker actually uses under the hood. It is a minimal runtime that's the default for Kubernetes. Perfect when you just need to run containers without extras
As containers became popular, the industry recognized the need for standards. The Open Container Initiative (OCI) created universal standards for container image format and runtime behavior. This means containers built with any OCI-compliant tool will run on any OCI-compliant runtime. For example, a container built by Docker can run flawlessly in Podman's runtime, and vise versa.
Use Containers
Now that we understand what containers are and how they work, let's get hands-on experience using them. We'll use a Python container as our running example.
Before we begin, you'll need to install Docker on your machine (if you haven't already). Recall that Docker uses a client-server architecture we discussed earlier. When you install Docker, you're getting both the Docker Client (the command-line interface you'll use) and the Docker Daemon (the background service that actually manages containers). Docker Desktop provides both components along with a user-friendly interface for Windows and macOS, while Linux users typically install Docker Engine directly. The installation process varies by platform, so follow the official Docker installation guide for your operating system.
Images
Pulling Images from Registries
Before we can run a container, we need to get a container image. The easiest way is to pull a pre-built image from a public registry like Docker Hub.
docker pull python:3.11This command downloads the official Python 3.11 image to your local machine. The format is repository:tag, where python is the repository name and 3.11 is the tag that specifies the version. If you omit the tag, Docker defaults to latest.
You can also pull specific variants of images:
docker pull python:3.11-slim    # Smaller image with minimal packages
docker pull python:3.11-alpine  # Even smaller, based on Alpine Linux
Extended Reading: Docker Hub is just one of many container registries. Other popular options include GitHub Container Registry (ghcr.io) and Google Container Registry (gcr.io). To pull from these registries, simply include the registry domain in your image path:
docker pull ghcr.io/joeferner/redis-commander:latest
docker pull gcr.io/kaniko-project/executor:latest
Managing Images
Once you start working with containers, you'll accumulate various images on your machine. Here are the essential commands to manage them:
# List all images on your machine
docker images

# Get detailed information about a specific image
docker inspect python:3.11

# Remove an image (only if no containers are using it)
docker rmi python:3.11

# Remove unused images to free up space
docker image prune
The docker images command shows useful information like image size, creation date, and unique image IDs. You'll notice that similar images often share layers, which is why the total size of multiple Python images might be less than you'd expect.
Running Containers
Basic Operations
To run a container, the basic command is simple:
docker run python:3.11This creates and starts a new container from the Python image. However, this container will start and immediately exit because there's no long-running process to keep it alive. We can try something more useful:
# Run a simple Python command
docker run python:3.11 python -c "print('Hello from container!')"

# Run a container in the background that will run for one hour if not stopped manually
docker run -d python:3.11 python -c "import time; time.sleep(3600)"
The -d flag runs the container in "detached" mode, which means it runs in the background without blocking your terminal. This can be useful for running long-lasting programs.
Interactive Mode
Often you'll want to interact with a container directly, like getting a shell inside it to explore or debug:
# Get an interactive Python shell inside the container
docker run -it python:3.11 python

# Get a bash shell to explore the container
docker run -it python:3.11 bash
The -it combination gives you an interactive terminal. Once inside, you can install packages, run scripts, or explore the filesystem just like you would on any Linux machine.
Port Mapping
For web applications or APIs, you'll need to expose ports so you can access them from your host machine:
# Run a simple HTTP server and map port 8000
docker run -p 8000:8000 python:3.11 python -m http.server 8000
The -p 8000:8000 maps port 8000 inside the container to port 8000 on your host machine. The format is host_port:container_port. Now you can visit http://localhost:8000 in your browser to access the server running inside the container.
You can also map to different ports:
# Map container port 8000 to host port 3000
docker run -p 3000:8000 python:3.11 python -m http.server 8000
Sharing Files and Configuration
Containers are isolated by default, which means files created inside them disappear when the container stops. To persist data or share files between your host machine and containers, use volume mounting:
# Mount the current directory to /app inside the container
docker run -v $(pwd):/app python:3.11 ls /app

# Mount a specific file
docker run -v $(pwd)/script.py:/script.py python:3.11 python /script.py
The -v flag creates a volume mount with the format host_path:container_path. Now files you create or modify in /app inside the container will actually be stored in your current directory on the host machine.
For configuration, you'll often need to pass environment variables to containers:
# Set environment variables
docker run -e DEBUG=true -e API_KEY=your_key python:3.11 python -c "import os; print(os.environ.get('DEBUG'))"

# Load environment variables from a file
docker run --env-file .env python:3.11 python -c "import os; print(os.environ)"
This is particularly useful for configuring database connections, API keys, or feature flags without hardcoding them into your application.
Managing Containers
Container Lifecycle
Containers have a lifecycle just like any other process. Here are the essential commands for managing running containers:
# List running containers
docker ps

# List all containers (including stopped ones)
docker ps -a

# Stop a running container
docker stop <container_id_or_name>

# Start a stopped container
docker start <container_id_or_name>

# Restart a container
docker restart <container_id_or_name>

# View container logs
docker logs <container_id_or_name>

# Follow logs in real-time
docker logs -f <container_id_or_name>
Fun fact: you don't need to type the full container ID. Just the first few characters are enough, as long as they're unique.
You can also give your containers meaningful names:
# Run a container with a custom name
docker run --name my-python-app -d python:3.11 python -c "import time; time.sleep(300)"

# Now you can reference it by name
docker logs my-python-app
docker stop my-python-app
Executing Commands
Sometimes you need to run additional commands in a container that's already running. This is where docker exec comes in handy:
# Execute a single command in a running container
docker exec my-python-app python -c "print('Hello from exec!')"

# Get an interactive shell in a running container
docker exec -it my-python-app bash

# Install additional packages in a running container
docker exec my-python-app pip install requests
This is incredibly useful for debugging, installing additional tools, or making quick changes without recreating the entire container.
Cleaning Up
As you experiment with containers, you'll accumulate stopped containers and unused images. Here's how to clean up:
# Remove a specific stopped container
docker rm <container_id_or_name>

# Remove all stopped containers
docker container prune

# Remove unused images
docker image prune

# Remove everything unused (containers, images, networks, build cache)
docker system prune
Regular cleanup keeps your system tidy and frees up disk space.
Extended Reading: When you need to run multiple related containers (like a web application with a database), managing them with individual
docker runcommands becomes cumbersome. Docker Compose solves this by letting you define your entire multi-container application in a single YAML file. It can also replace complexdocker runcommands even for single containers, making it easier to manage containers with lots of configuration options:services: web: image: nginx ports: - "8080:80" database: image: postgres environment: POSTGRES_PASSWORD: secretWith
docker compose up, you can start all services at once. This becomes essential for complex applications where containers need to communicate with each other. Check out the Docker Compose quickstart and sample applications to see practical examples.
Build Containers
So far we've been using pre-built images from registries like Docker Hub. But what happens when you want to package your own application? The Python images we've used are great starting points, but they don't include your specific code, dependencies, or configuration. To deploy the image classification API server we built in Wrap AI Models with APIs, we need to create our own container image that bundles everything together.
Building custom container images transforms your application from something that requires manual setup on each machine into a portable package that runs consistently anywhere. Instead of asking users to install Python, download dependencies, configure environment variables, and run multiple commands, they can simply execute docker run your-app and everything works.
Interactive Approach (Not Recommended)
Before diving into the proper way to build images, let's briefly look at the manual approach to understand why it's not ideal. You could theoretically create a custom image by starting a container, installing everything manually, and then saving it using the docker commit command:
# Start an interactive Python container
docker run -it python:3.11 bash

# Inside the container, manually install dependencies
pip install fastapi uvicorn transformers torch pillow sqlalchemy

# Copy your application files (you'd need to mount or copy them somehow)
# Configure everything manually...

# Exit the container, then commit it as a new image
docker commit container_id my-app:latest
While this technically works, it has serious drawbacks: the process isn't reproducible, there's no documentation of what was installed, it's error-prone, and you can't easily version or modify your setup. This approach is like cooking without a recipe - it might work once, but you'll struggle to recreate it consistently.
Dockerfile: The Recipe for Container Images
The proper way to build container images is with a Dockerfile: a text file containing step-by-step instructions for creating your image. Remember the layered system we discussed earlier? A Dockerfile defines exactly what goes into each layer, making the build process completely reproducible and documented.
Think of a Dockerfile as a recipe that tells Docker: "Start with this base ingredient (base image), add these components (dependencies), mix in this code (your application), and serve it this way (startup command)." Anyone with your Dockerfile can recreate the exact same image, just like anyone can follow a recipe to make the same dish.
Each instruction in a Dockerfile creates a new layer in your image. This connects directly to the efficiency benefits we discussed: if you only change your application code, Docker will reuse all the cached layers for the base image and dependencies, rebuilding only what's necessary.
Dockerfile Instructions
To write a Dockerfile, you need to understand the different instructions available. Each instruction tells Docker what to do during the build process, as list below.
Foundation Instructions set up the basic environment:
FROMspecifies which base image to start from (always the first instruction)WORKDIRsets the working directory for subsequent commands
File Operations handle getting your code and files into the container:
COPYtransfers files from your host machine to the containerADDsimilar to COPY but with additional features like extracting archives
Build-time Instructions execute during image creation:
RUNexecutes commands during the build process, like installing packagesARGdefines build-time variables that can be passed during the build
Runtime Configuration defines how the container behaves when it runs:
ENVsets environment variables that persist when the container runsEXPOSEdocuments which ports the application uses (for documentation only)VOLUMEdefines mount points for persistent or shared data
Execution Instructions control what happens when the container starts:
CMDprovides default command and arguments (can be overridden)ENTRYPOINTsets the main command that always runs (harder to override)
Instructions in a Dockerfile help you structure your image logically: start with foundation, add your files, configure the build environment, set runtime properties, and finally define execution behavior.
Building the Image Classification Server
Let's containerize our image classification API server. First, we need to organize our project files:
my-ai-api/
├── Dockerfile
├── requirements.txt
├── main.py
└── ai_api.db (will be created)
Create a requirements.txt file listing all Python dependencies:
fastapi==0.104.1
uvicorn==0.24.0
transformers==4.35.2
torch==2.1.1
pillow==10.1.0
sqlalchemy==2.0.23
numpy<2
Now, here's our Dockerfile with step-by-step explanations:
# Start with official Python 3.11 image (creates base layer)
FROM python:3.11-slim

# Set working directory inside container
WORKDIR /app

# Copy requirements first (for better layer caching)
COPY requirements.txt .

# Install Python dependencies (creates dependency layer)
RUN pip install --no-cache-dir -r requirements.txt

# Copy application code (creates application layer)
COPY server.py .

# Create directory for database
RUN mkdir -p ./data

# Expose port 8000 for the API
EXPOSE 8000

# Command to run when container starts
CMD ["python", "server.py"]
Let's break down each instruction:
- FROM: Specifies the base image. We use
python:3.11-slimfor a smaller footprint - WORKDIR: Sets
/appas the working directory for subsequent commands - COPY requirements.txt: Copies only requirements first to leverage Docker's layer caching
- RUN pip install: Installs dependencies in a separate layer
- COPY main.py: Copies application code in its own layer
- EXPOSE: Documents that the container uses port 8000 (doesn't actually publish it)
- CMD: Defines the default command when the container starts
Building and Running Your Container
Now let's build the image from our Dockerfile:
# Navigate to your project directory
cd my-ai-api

# Build the image with a tag
docker build -t my-ai-classifier:v1.0 .
Docker will execute each instruction in your Dockerfile, creating layers as it goes. Once built, run your containerized API server:
# Run the container with port mapping
docker run -p 8000:8000 my-ai-classifier:v1.0

# Or run in detached mode with volume for persistent database
docker run -d -p 8000:8000 -v $(pwd)/data/ai_api.db:/app/data/ai_api.db --name ai-server my-ai-classifier:v1.0
Your API server is now running in a container! You can access it at http://localhost:8000 just like before, but now everything runs in a completely isolated, reproducible environment.
Extended Reading: To build more efficient and maintainable container images, consider these advanced practices:
- .dockerignore files to exclude unnecessary files from build context
- Multi-stage builds for smaller production images
- Dockerfile best practices for security and performance
These techniques become increasingly important as your applications grow in complexity and you move toward production deployments.
Distributing Your Images
Now that you've built a working container image, you might want to share it with others or deploy it to production servers. Container registries serve as distribution hubs where you can publish your images for others to download and use.
To share your image, you need to push it to a registry. Let's use Docker Hub as an example:
# First, login to Docker Hub
docker login

# Tag your image with your Docker Hub username
docker tag my-ai-classifier:v1.0 yourusername/my-ai-classifier:v1.0

# Push the image to Docker Hub
docker push yourusername/my-ai-classifier:v1.0
The tagging step is crucial: it follows the format registry/username/repository:tag. For Docker Hub, you only need username/repository:tag since it's the default registry.
Once pushed, anyone can run your containerized API server with a single command:
docker run -p 8000:8000 yourusername/my-ai-classifier:v1.0Videos:
Extended Reading: The same push process works for other registries like GitHub Container Registry (
ghcr.io/username/repository:tag) or Google Container Registry (gcr.io/project/repository:tag). Many registries also offer automated building: instead of building images locally, you can push your Dockerfile and source code to the registry, and it will build the image for you. This is particularly useful for CI/CD pipelines where you want automated builds triggered by code changes. Services like Docker Hub's Automated Builds, GitHub Actions with Container Registry, and cloud provider build services handle the entire build process in the cloud.
Exercise
Containerize Your AI API Server
Transform your image classification API server from Wrap AI Models with APIs into a portable, reproducible container that can run anywhere:
- Write a Dockerfile: Create a comprehensive Dockerfile using the instructions covered in Dockerfile Instructions
- Build and Run: Follow the process demonstrated in Building and Running Your Container to create your container image and run it with appropriate port mapping and volume mounting
- Test Functionality: Verify that your containerized API server works identically to the original version, with all endpoints accessible and functioning correctly
Advanced Challenges (Optional):
- Optimization: Implement techniques from the extended reading sections, such as creating a .dockerignore file and exploring multi-stage builds for smaller image sizes
- Distribution: Practice the workflow from Distributing Your Images by pushing your image to Docker Hub or GitHub Container Registry, making it accessible to others
The goal is to transform your API from a manual setup requiring multiple installation steps into a single-command deployment that works consistently across different environments.