Cloud Deployment
TL;DR: The "cloud" is just computers in data centers you can rent remotely. Learn how to deploy your containerized AI API to cloud VMs, covering remote access, Docker installation, and production-ready HTTPS setup.
After AI compute hardware and Packaging & containerization, now we have the confidence that we can deploy our AI system to a computer other than our own PC. Other than the fact that we can do it, there are also reasons that we might want to do it. AI systems, especially API servers like the one we implemented earlier, usually need to run 24/7, which you probably shouldn't rely on your own PC. Running AI systems often use lots of computational resources, which in turn make computers produce heat and noise, something you probably don't enjoy at home.
In this module we will learn how to deploy our system on to the "cloud". This is probably a buzzword you have heard for quite a while, only recently overtaken by the "AI" hype. You will learn that cloud deployment has nothing to do with clouds in the sky: the cloud infrastructure essentially is composed of computers inside data centers that are setup in a way that can be accessed remotely, thus cloud deployment (in most cases) comes down to deployment on to a remote computer.
Cloud Infrastructure
What is "the Cloud"?
When we talk about "the cloud," we're really talking about computers in data centers that you can access over the internet. The term comes from old network diagrams where engineers would draw a cloud shape to represent "the internet" or any network whose internal details weren't important at that moment. Over time, this symbol became associated with computing resources accessed remotely.

Cloud infrastructure emerged from a practical problem. Companies like Amazon and Google built massive computing facilities to handle peak loads (holiday shopping spikes, search traffic surges), but these expensive resources sat mostly idle during normal times. They realized they could rent out this spare capacity to others, and the modern cloud industry was born. What started as monetizing excess capacity evolved into a fundamental shift in how we provision computing resources.
The key technical innovation that made cloud practical is virtualization. This technology allows one physical machine to be divided into many isolated virtual machines, each acting like a separate computer with its own operating system. A single powerful server might run dozens of virtual machines for different customers simultaneously. This sharing model dramatically improved efficiency, since physical servers could be fully utilized rather than sitting idle.
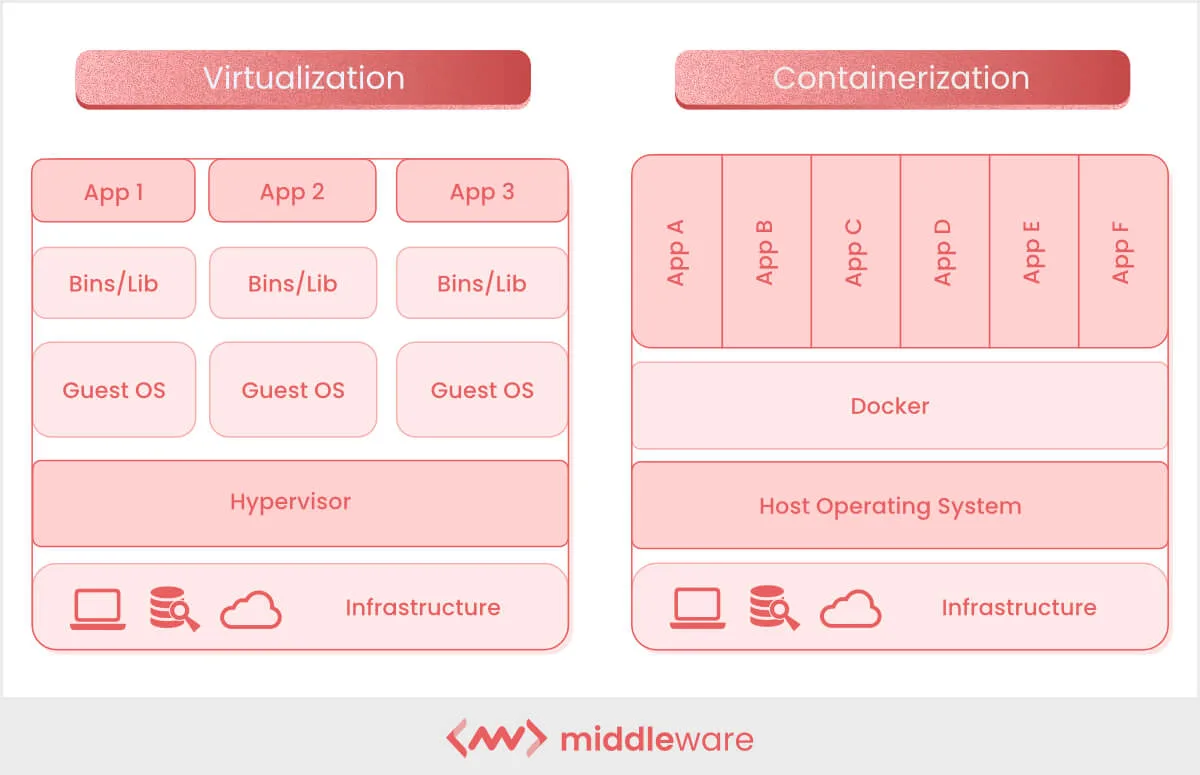
You might recall from Packaging & containerization that containers also provide isolation, but they work at a different level. Virtual machines virtualize the entire hardware, giving each VM its own complete operating system. Containers, in contrast, share the host's operating system kernel and only isolate the application and its dependencies. This makes VMs heavier but more isolated, suitable for running entirely different operating systems or providing stronger security boundaries. Containers are lighter and faster, ideal for packaging applications. In practice, cloud infrastructure often uses both: VMs to divide physical servers among customers, and containers running inside those VMs to package and deploy applications.
Cloud infrastructure is built in three layers. The physical layer forms the foundation: thousands of servers organized in racks inside data centers, connected by high-speed networks, with massive storage arrays and redundant power and cooling systems. The virtualization layer sits on top, where hypervisors create and manage virtual machines, allocating slices of physical resources while ensuring isolation between customers. The management layer ties everything together with APIs for programmatic control, orchestration systems for resource allocation, monitoring tools for health tracking, and billing systems that measure usage.
Together, these layers transform a pile of hardware into a self-service platform where you can spin up a server in seconds with a few clicks or API calls.
Videos:
Extended Reading: To dive deeper into cloud infrastructure architecture:
- What is a Data Center? from AWS explains the physical infrastructure
- Understanding Hypervisors from Red Hat covers virtualization technology in detail
- What is Cloud Computing? from AWS provides a comprehensive overview
Major Cloud Providers
Three companies dominate the cloud infrastructure market, each with distinct strengths.
Amazon Web Services (AWS) is the market leader, launched in 2006 when Amazon started renting out its excess computing capacity. AWS offers the most comprehensive service catalog with over 200 services covering everything from basic compute to specialized AI tools. This breadth makes AWS powerful but can also be overwhelming for beginners. The platform is known for its maturity, global reach with data centers in dozens of regions, and extensive documentation. Most enterprise companies use AWS in some capacity.
Google Cloud Platform (GCP) entered the market later but brought Google's expertise in handling massive scale. GCP excels in data analytics and AI/ML services, offering tools like BigQuery for data warehousing and Vertex AI for machine learning. The platform tends to be more developer-friendly with cleaner interfaces and better default configurations. For AI system deployment, GCP's strengths in machine learning infrastructure and competitive GPU pricing make it particularly attractive.
Microsoft Azure holds strong appeal for enterprises already using Microsoft products. Azure integrates seamlessly with Windows Server, Active Directory, and Office 365. This makes it the natural choice for organizations with existing Microsoft infrastructure. Azure has grown rapidly and now rivals AWS in service offerings, with particular strength in hybrid cloud scenarios where companies need to connect on-premises systems with cloud resources.
Extended Reading: Beyond the "big three," many alternatives exist for different needs:
Affordable and Simple: DigitalOcean and Linode offer straightforward interfaces and competitive pricing, ideal for startups and smaller projects.
GPU-Focused for AI: Lambda Labs and CoreWeave specialize in providing cost-effective GPU instances optimized for machine learning workloads.
European Providers: For those prioritizing data sovereignty and GDPR compliance, European providers offer compelling alternatives. Hetzner (Germany) is known for exceptional price-performance ratios with data centers across Europe. OVHcloud (France) operates one of Europe's largest cloud infrastructures. Scaleway (France) positions itself as a European alternative with strong AI capabilities. These providers often cost significantly less than US hyperscalers while keeping data within EU jurisdiction.
Common Cloud Services
Cloud providers offer various service types, each with different tradeoffs between control, convenience, and cost. Understanding these options helps you choose the right approach for deploying your AI systems.
Virtual Machines provide dedicated computing instances that behave like traditional servers. You get full control over the operating system and can install whatever software you need. This familiarity makes VMs approachable if you're comfortable with traditional server management. However, you're responsible for all maintenance, security patches, and configuration. You also pay for the VM whether it's actively processing requests or sitting idle. Examples include EC2 on AWS, Compute Engine on GCP, and Virtual Machines on Azure.
Container Services let you run the Docker containers we learned about in Packaging & containerization. The cloud provider manages the underlying infrastructure while you focus on your containerized applications. Many container services offer automatic scaling, spinning up more containers when traffic increases and shutting them down when traffic drops. This means you only pay for actual usage. The learning curve can be steeper than VMs, and debugging containerized applications in production requires different skills. Examples include ECS/EKS on AWS, Cloud Run on GCP, and Container Instances on Azure.
GPU Instances are virtual machines with attached graphics processing units, essential for training large AI models or running inference on complex models. Without buying expensive hardware upfront, you get access to cutting-edge GPUs. The downside is cost. GPU instances can run hundreds of dollars per day, and during peak times (like when new AI research creates demand), they may be unavailable. Examples include P-series and G-series instances on AWS, A2 and G2 instances on GCP, and NC and ND-series on Azure.
Managed AI Services provide pre-configured platforms specifically for deploying machine learning models. These services handle infrastructure scaling, model versioning, monitoring, and often include tools for A/B testing different model versions. They're the easiest way to deploy AI systems, requiring minimal DevOps knowledge. The tradeoff is less flexibility and potential vendor lock-in, as these platforms often use proprietary APIs. Examples include SageMaker on AWS, Vertex AI on GCP, and Azure Machine Learning on Azure.
Object Storage provides scalable storage for large datasets, model files, and other unstructured data. Unlike traditional file systems, object storage is designed for durability and massive scale. Files are typically replicated across multiple data centers, making data loss extremely unlikely. Storage costs are remarkably cheap, often a few cents per gigabyte per month. However, object storage isn't designed for real-time access. Operations have higher latency than local disks, making it suitable for storing training data and model weights but not for serving predictions. Examples include S3 on AWS, Cloud Storage on GCP, and Blob Storage on Azure.
Extended Reading: Beyond compute and storage services, cloud providers offer specialized services for different use cases:
Serverless computing (like AWS Lambda or Google Cloud Functions) runs your code in response to events without any server management. You write individual functions and pay only for execution time measured in milliseconds. This is fundamentally different from VMs or containers where you manage long-running processes.
Managed databases (like RDS, Cloud SQL, or Cosmos DB) handle database administration automatically. Unlike object storage which stores files, these provide structured data storage with queries, transactions, and relational integrity.
Content delivery networks (like CloudFront or Cloud CDN) cache and serve your content from servers distributed worldwide. Rather than running your application, they focus on delivering static assets (images, videos, model outputs) with minimal latency to users anywhere.
Choosing the Right Service
When selecting a cloud service for your AI system, you need to balance several considerations.
Your technical expertise matters because some services require deep knowledge of server management while others abstract that away. Think about whether you're comfortable SSHing into a server, managing operating system updates, and debugging infrastructure issues, or whether you'd prefer to focus purely on your application code.
Your scaling requirements also play a role. If you expect steady, predictable traffic, a simple always-on server works fine. But if traffic fluctuates dramatically (say, high during business hours and nearly zero at night), you might benefit from services that scale automatically.
Budget is obviously important, but it's not just about the total amount you can spend. Consider whether you need predictable monthly costs for planning purposes, or whether you're comfortable with variable bills that depend on actual usage.
The level of control you need over the infrastructure influences this decision too. Some applications require specific system configurations, custom networking setups, or particular security arrangements that only low-level services like VMs can provide.
Finally, your timeline matters. How quickly do you need to get your system running? Some services let you deploy in hours, while others require days or weeks of setup and learning.
While managed services and usage-based pricing sound appealing with their promises of convenience and "only pay for what you use," there are significant benefits to starting with simpler services that offer strong control and transparent pricing.
Virtual machines with fixed pricing provide cost predictability. When you rent a VM at a fixed monthly rate, you know exactly what you'll pay. There are no surprises. You can run your application, make mistakes during development, and experiment freely without worrying about an unexpected bill at month's end. This predictability is particularly valuable when you're learning or running services with steady traffic patterns.
Direct control means you understand what's happening. With a VM, you manage the operating system, install software, and configure everything yourself. While this requires more work upfront, it builds your understanding of how systems actually work. You can troubleshoot issues by logging into the server, checking processes, and examining logs directly. This transparency makes debugging much simpler compared to managed services where problems might be hidden behind abstraction layers.
Beware of usage-based pricing pitfalls. The cloud industry has numerous horror stories of unexpected bills. In 2024, a developer woke up to find a $104,500 bill from Netlify for a simple documentation site. Another case saw Cloudflare demanding $120,000 within 24 hours. AWS Lambda functions can see costs spike 11x from network delays alone. Even a misconfigured S3 bucket resulted in $1,300 in charges from unauthorized requests in a single day. These aren't rare edge cases. They happen regularly because usage-based pricing makes costs difficult to predict and easy to lose track of.
Vendor lock-in with managed services. When you use managed AI platforms like SageMaker or Vertex AI, you often write code that depends on their proprietary APIs. Research shows 71% of organizations cite vendor lock-in as a deterrent to adopting more cloud services. Migrating away requires rewriting significant portions of your application. Data formats may be incompatible. Features you relied on might not exist elsewhere. The switching costs become so high that you're effectively locked into that provider's ecosystem, even if prices increase or service quality declines.
For the image classification API server we've built in this course, a sensible starting point would be a small VM running your Docker container. You get full control, predictable monthly costs (often $5-20 for basic instances), and the ability to scale up by switching to a larger VM when needed. This approach teaches you cloud fundamentals without the risk of surprise bills or vendor lock-in. As you gain experience and your requirements grow clearer, you can make informed decisions about whether managed services justify their additional complexity and cost uncertainty.
Videos:
Extended Reading: For deeper exploration of cloud economics and vendor lock-in:
- The Dark Side of Cloud Computing: Unexpected Costs examines billing horror stories and lessons learned
- Critical Analysis of Vendor Lock-in provides academic perspective on cloud migration challenges
- Understanding AWS Lambda Costs breaks down serverless pricing complexities
Cloud Deployment in Practice
Now that you understand cloud infrastructure and have chosen to start with VMs for their transparency and cost predictability, let's walk through actually deploying your containerized AI API server. While cloud providers differ in their web interfaces and specific features, the core deployment process remains remarkably similar across platforms. Whether you're using AWS, GCP, Azure, Hetzner, or any other provider, you'll follow the same fundamental steps: create a VM, access it via SSH, install Docker, and run your container.
We'll use the image classification API server from Wrap AI Models with APIs that we containerized in Packaging & containerization as our running example. The beauty of containers is that once you have your Dockerfile and image ready, deployment becomes straightforward regardless of where you're running it.
Selecting Your Virtual Machine
When creating a VM through your cloud provider's interface, you'll need to make several decisions about its configuration. These choices affect both performance and cost, but the good news is you can always resize or recreate your VM later if your needs change.
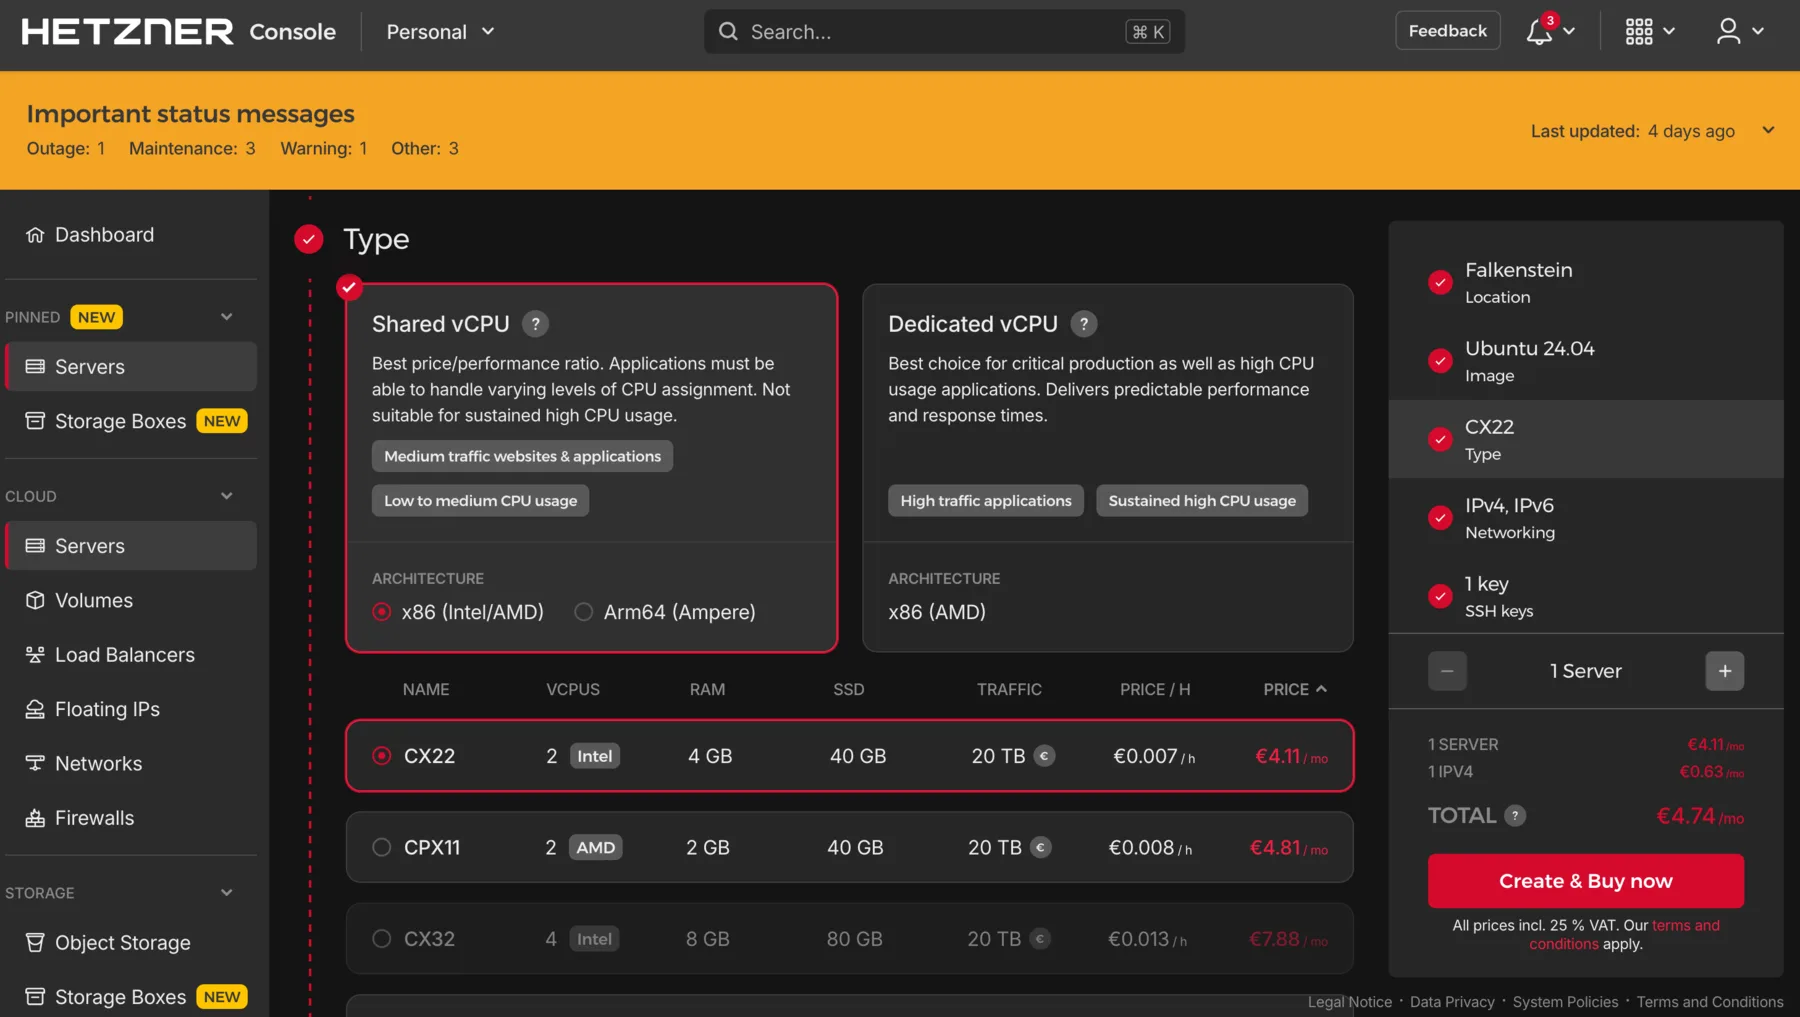
Operating System: Choose a Linux distribution. Ubuntu LTS (Long Term Support) versions like 22.04 or 24.04 are excellent choices because they receive security updates for five years and have extensive community documentation. Most cloud providers offer Ubuntu as a one-click option. Other good alternatives include Debian or Rocky Linux, but Ubuntu's popularity means you'll find more tutorials and troubleshooting help online.
CPU and Memory: For running our containerized AI API server without GPU acceleration, start with a modest configuration. A VM with 2-4 virtual CPUs and 4-8 GB of RAM handles most small to medium traffic loads comfortably. Remember, you're running the model inference on CPU, not training it. If you find performance lacking later, you can upgrade to a larger instance. Starting small keeps costs down while you're learning and testing.
Storage: Allocate 20-30 GB of disk space. This covers the operating system (typically 5-10 GB), Docker itself (a few GB), your container images (varies by model size, but usually under 5 GB for our API server), and room for logs and temporary files. Most providers charge extra for additional storage beyond a base amount, so don't over-allocate. You can expand storage later if needed.
Network Configuration: Ensure your VM gets a public IP address so you can access it from the internet. Most providers assign one automatically, but some require you to explicitly request it. You'll also need to configure security groups or firewall rules to allow incoming traffic on specific ports. At minimum, open port 22 for SSH access (so you can log in) and port 8000 for your API server. Many providers default to blocking all incoming traffic for security, so you must explicitly allow these ports.
Authentication: Most providers offer SSH key-based authentication during VM creation. If given the option, provide your public SSH key now. This is more secure than password authentication and saves setup time later. If you don't have an SSH key yet, you can generate one locally before creating the VM (more on this in the next section).
A typical small VM suitable for our purposes costs $5-20 per month depending on the provider and region. European providers like Hetzner often offer better price-performance ratios than the major cloud providers for basic VMs. Start with the smallest configuration that meets the minimum requirements. You can always scale up, but you can't get money back for over-provisioning.
Accessing Your Remote Server
Once your VM is created, you need a way to access it remotely to install software and configure it. This is done through SSH (Secure Shell), a protocol that lets you securely connect to and control a remote computer over the internet.
What is SSH? Think of SSH as a secure remote control for your server. It encrypts all communication between your local computer and the remote server, so passwords and commands can't be intercepted. When you SSH into a server, you get a command-line interface just as if you were sitting at that machine's keyboard. This is how system administrators manage servers around the world.
Your First Connection: After your VM is created, your cloud provider will give you its public IP address (something like 203.0.113.42). You'll also need a username, which varies by provider. Many VMs default to the root user (the administrator account with full system privileges). Ubuntu VMs from major cloud providers typically use ubuntu, Azure often uses azureuser, and some providers let you choose during creation. To connect, open a terminal on your local machine and run:
ssh [email protected]Replace username with your actual username and 203.0.113.42 with your server's IP address. The first time you connect, you'll see a warning asking if you trust this server. Type yes to continue. If you set up password authentication, you'll be prompted for a password. Once authenticated, you'll see a command prompt indicating you're now controlling the remote server.
SSH Keys (More Secure): Password authentication works, but SSH keys are more secure and convenient. An SSH key pair consists of a private key (kept secret on your computer) and a public key (shared with servers). Think of it like a special lock and key: you give servers a copy of the lock (public key), and only your key (private key) can open it.
To generate an SSH key pair on your local machine:
ssh-keygen -t ed25519 -C "[email protected]"This creates two files in ~/.ssh/: id_ed25519 (private key, never share this) and id_ed25519.pub (public key). When prompted for a passphrase, you can press Enter to skip it for convenience, though adding one provides extra security. If you created your VM without providing a public key, you can add it now by logging in with password authentication and running:
mkdir -p ~/.ssh
chmod 700 ~/.ssh
echo "your-public-key-content-here" >> ~/.ssh/authorized_keys
chmod 600 ~/.ssh/authorized_keys
Paste the entire contents of your id_ed25519.pub file in place of your-public-key-content-here. From then on, you can SSH without passwords.
First Tasks After Login: When you first access your new server, perform these essential setup steps:
# Update package lists and upgrade existing packages
sudo apt update && sudo apt upgrade -y
This ensures your system has the latest security patches. The sudo command runs commands as administrator (root user). On Ubuntu, the default user has sudo privileges. If you're logged in as root directly, you can omit sudo from commands, though it's still good practice to create a regular user for daily work:
# Create a new user (skip if you already have a non-root user)
adduser yourname

# Give the new user sudo privileges
usermod -aG sudo yourname
Working as root for routine tasks is risky because it's too easy to accidentally damage the system with a mistyped command.
You should also configure a basic firewall using UFW (Uncomplicated Firewall), which comes pre-installed on Ubuntu:
# Allow SSH so you don't lock yourself out
sudo ufw allow 22/tcp

# Allow your API server port
sudo ufw allow 8000/tcp

# Enable the firewall
sudo ufw enable
This firewall runs on the VM itself and adds an additional layer of protection beyond your cloud provider's security groups. Now you have a freshly configured, secure server ready for installing Docker and deploying your application.
Installing Docker
With your server configured, the next step is installing Docker so you can run containerized applications. The official Docker installation guide for Ubuntu provides several installation methods, but for production servers, we'll use the repository method rather than convenience scripts.
Why Not Convenience Scripts? You might find guides suggesting you can install Docker with a single command using curl https://get.docker.com | sh. While this works, Docker's own documentation warns against using it in production environments. The script doesn't give you control over which version gets installed and can behave unexpectedly during system updates. For learning and production deployments, taking the proper approach builds better habits.
Installation Steps: First, remove any old or conflicting Docker installations:
sudo apt remove docker docker-engine docker.io containerd runcIf these packages aren't installed, apt will simply report they're not found. That's fine. Next, install prerequisite packages and add Docker's official repository:
# Install packages to allow apt to use repositories over HTTPS
sudo apt install -y ca-certificates curl gnupg lsb-release

# Add Docker's official GPG key
sudo install -m 0755 -d /etc/apt/keyrings
curl -fsSL https://download.docker.com/linux/ubuntu/gpg | sudo gpg --dearmor -o /etc/apt/keyrings/docker.gpg
sudo chmod a+r /etc/apt/keyrings/docker.gpg

# Set up the Docker repository
echo \
  "deb [arch=$(dpkg --print-architecture) signed-by=/etc/apt/keyrings/docker.gpg] https://download.docker.com/linux/ubuntu \
  $(. /etc/os-release && echo "$VERSION_CODENAME") stable" | \
  sudo tee /etc/apt/sources.list.d/docker.list > /dev/null
These commands set up Docker's official package repository so apt knows where to download Docker from. Now install Docker Engine:
# Update apt package index
sudo apt update

# Install Docker Engine, containerd, and Docker Compose
sudo apt install -y docker-ce docker-ce-cli containerd.io docker-buildx-plugin docker-compose-plugin
This installs several components: docker-ce is the Docker Engine itself, docker-ce-cli provides the command-line interface, containerd.io is the container runtime, and the plugins add useful features like building images and managing multi-container applications.
Verify Installation: Test that Docker installed correctly by running the hello-world container:
sudo docker run hello-worldYou should see a message explaining that Docker successfully pulled and ran a test image. This confirms everything is working.
Adding Your User to the Docker Group: By default, Docker commands require root privileges (hence sudo docker). For convenience, you can add your user to the docker group:
# Add your user to the docker group
sudo usermod -aG docker $USER

# Apply the group change (or log out and back in)
newgrp docker
Now you can run Docker commands without sudo. Be aware this is a security consideration: users in the docker group effectively have root-level privileges because they can run containers with full system access. For a personal learning server, this trade-off is acceptable. In multi-user production environments, you'd want more careful access controls.
Test that you can run Docker without sudo:
docker run hello-worldIf this works without requiring a password, you're all set. Docker is now installed and ready to run your containerized applications.
Deploying Your Container
Now comes the exciting part: actually running your containerized AI API server on the cloud. You have two main options for getting your container image onto the server.
Option 1: Pull from a Registry (Recommended). If you pushed your image to Docker Hub or another registry as described in Packaging & containerization, you can pull it directly on your server:
docker pull yourusername/my-ai-classifier:v1.0This downloads your image from the registry. It's the cleanest approach because the image building happened on your local machine or in an automated build system, and the server just needs to run it.
Option 2: Build on the Server. If you haven't published your image to a registry, you can build it directly on the server. First, transfer your project files (Dockerfile, requirements.txt, main.py) to the server using SCP (Secure Copy):
# Run this on your local machine, not the server
scp -r ~/path/to/my-ai-api [email protected]:~/
Then SSH into your server and build the image:
cd ~/my-ai-api
docker build -t my-ai-classifier:v1.0 .
Building on the server works but uses server resources and takes longer. For production workflows, using a registry is cleaner and allows you to test images locally before deploying them.
Running Your Container: Once you have the image (either pulled or built), run it with the following command:
docker run -d -p 8000:8000 --restart unless-stopped --name ai-api my-ai-classifier:v1.0Let's break down what each flag does:
-druns the container in detached mode (in the background)-p 8000:8000maps port 8000 on the host to port 8000 in the container, making your API accessible--restart unless-stoppedtells Docker to automatically restart the container if it crashes or when the server reboots (but not if you manually stopped it)--name ai-apigives the container a friendly name so you can reference it easilymy-ai-classifier:v1.0is the image name and tag to run
If your application needs persistent data (like the SQLite database from our API server), mount a volume:
docker run -d -p 8000:8000 --restart unless-stopped \
  -v ~/ai-data:/app/data \
  --name ai-api my-ai-classifier:v1.0
This creates a directory ~/ai-data on your server and mounts it to /app/data inside the container, so database files persist even if the container is recreated.
Verification: Check that your container is running:
docker psYou should see your ai-api container listed with status "Up". View the container's logs to ensure it started properly:
docker logs ai-apiYou should see output from uvicorn indicating the server started successfully. Now test the API locally on the server:
curl http://localhost:8000If you get a response (likely your API's root endpoint message), the container is working. Finally, test from your local machine by visiting http://203.0.113.42:8000 in your browser (replace with your server's actual IP). If you see your API respond, congratulations! Your containerized AI application is now running on the cloud.
If you can't access it externally, double-check that your cloud provider's security group allows incoming traffic on port 8000, and that UFW allows it (sudo ufw status should show port 8000 allowed).
Production Considerations
Your container is running, but a production deployment requires thinking beyond just getting it started. Here are essential practices for keeping your application running reliably.
Container Persistence: We used --restart unless-stopped when running the container, which handles two important scenarios. If your application crashes due to a bug or runs out of memory, Docker automatically restarts it. More importantly, when you reboot your server for system updates, the container starts back up automatically. Without this flag, you'd have to manually run docker start ai-api after every server restart.
You can verify the restart policy is working:
# View container details including restart policy
docker inspect ai-api | grep -A 5 RestartPolicy
Basic Monitoring: Regularly check your container's health with these commands:
# Check if the container is running
docker ps

# View recent logs (last 50 lines)
docker logs --tail 50 ai-api

# Follow logs in real-time
docker logs -f ai-api

# Check resource usage
docker stats ai-api
The docker stats command shows CPU and memory usage. If you notice memory climbing steadily over days, you might have a memory leak in your application. For our API server, memory usage should stay relatively stable.
Monitor disk space regularly because Docker images and logs consume space:
# Check overall disk usage
df -h

# See Docker's disk usage
docker system df
If disk space becomes an issue, clean up unused Docker resources:
# Remove unused images
docker image prune -a

# Remove everything unused (images, containers, networks)
docker system prune
Be careful with docker system prune as it removes all stopped containers and unused images. Only run it when you're sure you don't need them.
Simple Maintenance: Eventually you'll need to update your application. Here's the basic process:
# Pull the new version of your image
docker pull yourusername/my-ai-classifier:v2.0

# Stop and remove the old container
docker stop ai-api
docker rm ai-api

# Run the new version
docker run -d -p 8000:8000 --restart unless-stopped \
  -v ~/ai-data:/app/data \
  --name ai-api yourusername/my-ai-classifier:v2.0
This approach causes downtime while you switch containers. For most learning and small production use cases, a few seconds of downtime during off-peak hours is acceptable.
Backing Up Data: If your container uses volumes for persistent data (like our SQLite database), back up those directories regularly:
# Create a backup directory
mkdir -p ~/backups

# Backup the data directory
tar -czf ~/backups/ai-data-$(date +%Y%m%d).tar.gz ~/ai-data
Run this as a cron job for automatic daily backups. You can also copy backups to your local machine:
# On your local machine
scp [email protected]:~/backups/ai-data-*.tar.gz ~/local-backups/
With these basic practices, you have a solid foundation for running containerized applications in production. Your system will automatically recover from crashes, you can monitor its health, perform updates, and protect against data loss.
Extended Reading: For more advanced production practices as your deployment grows:
BorgBackup provides automated, encrypted, and deduplicated backups. Unlike simple tar backups, Borg only stores changed data, saving significant space for daily backups. The quickstart guide shows how to set up encrypted repositories with automated cron jobs, ideal for production backup strategies.
Docker Log Rotation prevents logs from consuming all disk space. Configure maximum log sizes and file counts in your container run command or daemon.json to automatically rotate and compress logs. The
locallogging driver is recommended for production as it handles rotation by default.Zero-Downtime Deployments using blue-green strategies allow you to update containers without service interruption. By running both old and new versions simultaneously and switching traffic with a reverse proxy like Nginx, you eliminate downtime during updates. Tutorials for Docker Compose blue-green deployments show practical implementations.
Enabling HTTPS for Production
Your API server is now running and accessible at http://your-server-ip:8000. This works for testing, but it's unusable for production. Modern web browsers enforce strict security policies that make HTTP APIs impractical for real applications.
The Mixed Content Problem: If your frontend website is served over HTTPS (which it must be for users to trust it), browsers will block any HTTP requests it tries to make. This is called mixed content blocking. In 2024, approximately 93% of all web requests use HTTPS, and browsers like Firefox automatically upgrade or block non-HTTPS resources. You simply cannot have a modern web application that makes HTTP API calls from an HTTPS page.
Security Implications: HTTP traffic is transmitted in plain text. Anyone between your users and your server (your ISP, coffee shop WiFi, or malicious actors) can read and modify the data. With an AI API potentially handling sensitive information or user data, this is unacceptable. HTTPS encrypts all communication, ensuring data integrity and confidentiality.
Professional Expectations: Users expect to see a padlock icon in their browser's address bar. Browsers display prominent warnings for HTTP sites, damaging trust before users even interact with your service. Search engines also penalize HTTP sites in rankings.

To make your API production-ready, you need HTTPS, which requires a domain name and an SSL/TLS certificate. Let's walk through the process.
Understanding SSL/TLS Basics
HTTPS works through SSL/TLS certificates, which are digital documents that prove you own a domain and enable encrypted communication. When a user connects to https://yourdomain.com, their browser and your server perform a "handshake" where they exchange certificates and establish an encrypted connection. All subsequent data flows through this encrypted channel, preventing eavesdropping and tampering.
Certificate Authorities (CAs) are trusted organizations that issue certificates after verifying you control a domain. Historically, SSL certificates cost hundreds of dollars per year, creating a barrier for small projects and hobbyists. This changed in 2016 when Let's Encrypt, a nonprofit CA, began offering free automated certificates. Today, Let's Encrypt has issued certificates to over 700 million websites, making HTTPS accessible to everyone.
The Role of Reverse Proxies: Your containerized application runs on port 8000 inside the server, listening for plain HTTP requests. We don't want to modify the container to handle HTTPS directly because managing certificates inside containers is complex and inflexible. Instead, we'll use a reverse proxy (Nginx) that sits in front of your container. The proxy handles HTTPS on port 443 (the standard HTTPS port), terminates the SSL connection, and forwards decrypted requests to your container on port 8000. Your container never knows HTTPS is involved, keeping the architecture simple.
Getting a Domain Name
Before obtaining an SSL certificate, you need a domain name. Certificates are tied to specific domains, not IP addresses. You have both free and paid options.
Free Option: DuckDNS
DuckDNS provides free subdomains perfect for learning and personal projects. You get a domain like yourname.duckdns.org without paying anything. The service is simple:
- Visit duckdns.org and log in with GitHub, Google, or Twitter (no separate registration needed)
- Choose an available subdomain name
- Point it to your server's IP address through their web interface
DuckDNS also provides an API for updating your IP if it changes, useful for home servers. The main limitation is that your domain will be longer (e.g., my-ai-api.duckdns.org) and less professional than a custom domain. For learning and testing HTTPS setup, DuckDNS is perfect.

Paid Option: Domain Registrars
For production applications, consider purchasing your own domain. As of 2024, several registrars offer competitive pricing:
- Cloudflare Registrar: Sells domains at cost with no markup. A .com domain costs around $10/year. Highly recommended by developers for transparent pricing and excellent DNS management tools.
- Porkbun: Known for consistent pricing with no renewal hikes. .com domains around $11/year.
- Namecheap: Popular choice with good features and support. .com domains around $16/year for renewals. Includes free WHOIS privacy.
When choosing a registrar, focus on renewal prices, not just first-year promotional rates.
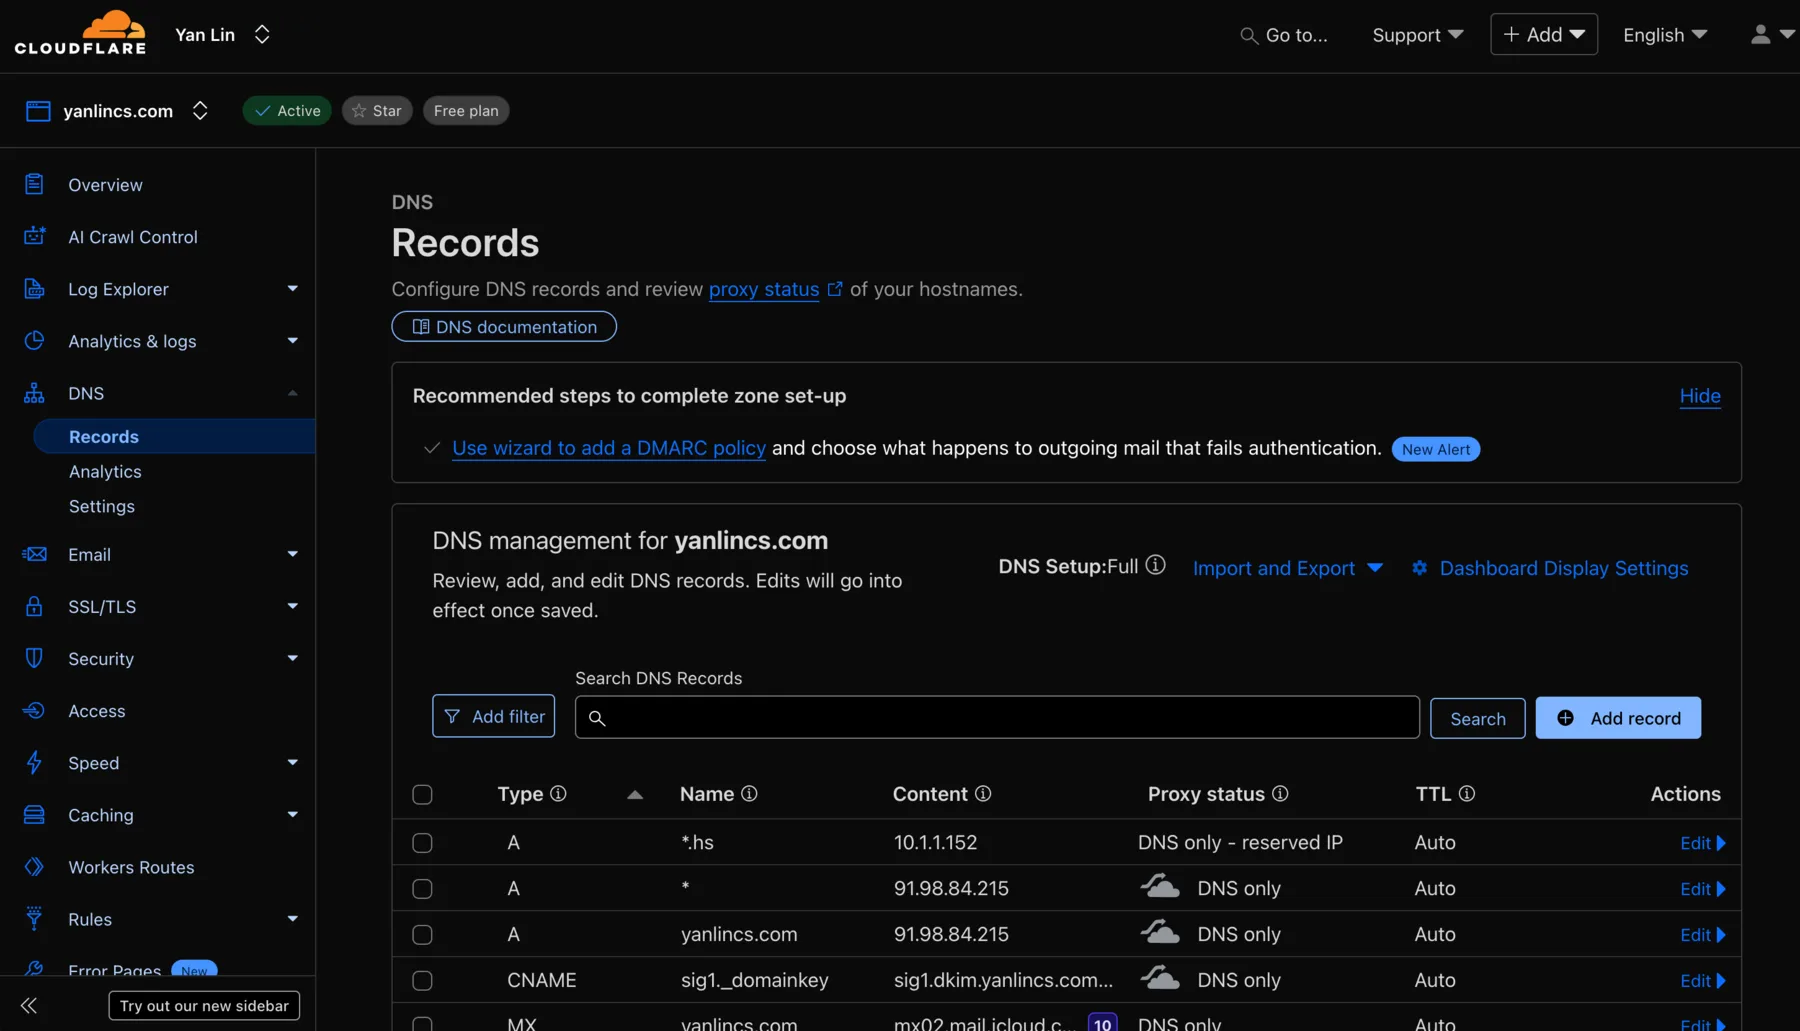
Setting Up DNS Records
Once you have a domain, you need to point it to your server:
- Find your server's public IP address (shown in your cloud provider's dashboard)
- In your domain provider's DNS settings, create an A record:
- Name:
@(or leave blank for root domain) or a subdomain likeapi - Type: A
- Value: Your server's IP address (e.g.,
203.0.113.42) - TTL: 3600 (or default)
- Name:
For DuckDNS, you simply enter your IP in their web interface. For other registrars, navigate to the DNS management section of your dashboard. DNS changes can take a few minutes to a few hours to propagate worldwide, though they're usually effective within 15 minutes.
You can verify DNS is working by pinging your domain:
ping yourdomain.comIf it resolves to your server's IP address, DNS is configured correctly.
Manual SSL Setup
The traditional approach to HTTPS uses Nginx as a reverse proxy and Certbot to obtain SSL certificates from Let's Encrypt. This method requires manual configuration but provides full transparency and control over how everything works.
Setting Up Nginx Reverse Proxy
With your domain pointing to your server, the next step is installing and configuring Nginx to act as a reverse proxy. Nginx will accept incoming requests on ports 80 (HTTP) and 443 (HTTPS) and forward them to your Docker container on port 8000.
Install Nginx:
sudo apt update
sudo apt install nginx -y
Nginx starts automatically after installation. You can verify it's running:
sudo systemctl status nginxCreate Nginx Configuration:
Create a configuration file for your domain:
sudo nano /etc/nginx/sites-available/your-domainAdd the following configuration (replace yourdomain.com with your actual domain):
server {
    listen 80;
    server_name yourdomain.com;

    location / {
        proxy_pass http://localhost:8000;
        proxy_set_header Host $host;
        proxy_set_header X-Real-IP $remote_addr;
        proxy_set_header X-Forwarded-For $proxy_add_x_forwarded_for;
        proxy_set_header X-Forwarded-Proto $scheme;
    }
}
This configuration tells Nginx to:
- Listen on port 80 for HTTP requests
- Accept requests for your domain
- Forward all requests to
localhost:8000(where your Docker container is running) - Pass along important headers so your application knows the original client's IP and protocol
Enable the Configuration:
# Create a symbolic link to enable the site
sudo ln -s /etc/nginx/sites-available/your-domain /etc/nginx/sites-enabled/

# Test the configuration for syntax errors
sudo nginx -t

# If the test passes, reload Nginx
sudo systemctl reload nginx
Test the Proxy:
Now you should be able to access your API through your domain name using HTTP:
curl http://yourdomain.comYou should see the response from your API server. Your browser should also work at http://yourdomain.com. The container is still running on port 8000, but Nginx is now proxying requests to it from port 80.
At this point, you have a working reverse proxy, but you're still using HTTP. The next step is adding SSL certificates for HTTPS.
Obtaining SSL Certificates with Certbot
Certbot is the official tool for obtaining Let's Encrypt certificates. It automates the entire process, including modifying your Nginx configuration to enable HTTPS.
Install Certbot:
sudo apt install certbot python3-certbot-nginx -yThe python3-certbot-nginx package includes the Nginx plugin that allows Certbot to automatically configure Nginx for HTTPS.
Obtain and Install Certificate:
Before running Certbot, ensure traffic on ports 80 and 443 is allowed. Let's Encrypt uses port 80 for domain validation, and port 443 is for HTTPS traffic. You need to configure this in two places:
First, update your server's firewall (UFW):
sudo ufw allow 80/tcp
sudo ufw allow 443/tcp
Second, ensure your cloud provider's security group or firewall rules also allow these ports. In your cloud provider's dashboard, check the security group attached to your VM and verify that inbound rules allow TCP traffic on ports 80 and 443 from anywhere (0.0.0.0/0). Without this, Let's Encrypt cannot reach your server to validate domain ownership.
Now run Certbot:
sudo certbot --nginx -d yourdomain.comReplace yourdomain.com with your actual domain. If you're using a subdomain (like api.yourdomain.com), use that instead.
Certbot will:
- Ask for your email address (for renewal notifications)
- Ask you to agree to the terms of service
- Ask if you want to receive EFF newsletters (optional)
- Validate that you control the domain by placing a temporary file on your server and verifying Let's Encrypt can access it via HTTP
- Obtain the SSL certificate
- Automatically modify your Nginx configuration to use the certificate
- Set up automatic HTTP to HTTPS redirection
How Domain Validation Works:
Let's Encrypt needs to verify you control the domain before issuing a certificate. The HTTP-01 challenge works by:
- Certbot creates a file in
/var/www/html/.well-known/acme-challenge/ - Let's Encrypt's servers request this file via
http://yourdomain.com/.well-known/acme-challenge/[random-string] - If the file is successfully retrieved, domain ownership is proved
- The certificate is issued
This is why your domain must already be pointing to your server's IP and port 80 must be accessible from the internet.
Automatic Renewal:
Let's Encrypt certificates expire every 90 days, but Certbot automatically sets up a systemd timer to renew certificates before they expire. You can test the renewal process:
sudo certbot renew --dry-runIf this command succeeds, automatic renewal is configured correctly. You don't need to do anything else; certificates will renew automatically in the background.
Check the renewal timer status:
sudo systemctl status certbot.timerWhat Certbot Changed:
After Certbot finishes, your Nginx configuration file (/etc/nginx/sites-available/your-domain) will look significantly different. Certbot added:
- A new
serverblock listening on port 443 for HTTPS - Paths to your SSL certificate and private key
- SSL security settings
- A redirect from HTTP (port 80) to HTTPS (port 443)
You can view the updated configuration:
sudo cat /etc/nginx/sites-available/your-domainYour API is now accessible via HTTPS at https://yourdomain.com.
Automatic SSL Setup
While the Nginx and Certbot approach works well, it requires manual configuration for each domain and updating Nginx configuration files. Traefik offers an alternative approach designed specifically for Docker environments, where SSL certificates are obtained and renewed automatically through container labels.
What is Traefik? Traefik is a modern reverse proxy built for dynamic container environments. Unlike Nginx which requires configuration files, Traefik watches your Docker containers and configures itself automatically based on labels you add to those containers. When a new container starts with appropriate labels, Traefik immediately begins routing traffic to it and can automatically request an SSL certificate.
Why Choose Traefik? Traefik excels in environments running multiple containerized services. Instead of editing Nginx configuration files and running Certbot for each new domain, you simply add labels to your Docker container. Traefik handles the rest: routing, SSL certificates, renewals, and load balancing. For a single API server, this might seem like overkill, but it demonstrates modern cloud-native patterns and scales effortlessly as your infrastructure grows.
Setting Up Traefik
First, create a Docker network that both Traefik and your application containers will use:
docker network create traefik-networkCreate a directory to store SSL certificates:
mkdir ~/traefik-certs
chmod 600 ~/traefik-certs
Now start the Traefik container with the necessary configuration:
docker run -d \
  --name traefik \
  --network traefik-network \
  -p 80:80 \
  -p 443:443 \
  -v /var/run/docker.sock:/var/run/docker.sock:ro \
  -v ~/traefik-certs:/letsencrypt \
  --restart unless-stopped \
  traefik:v3.0 \
  --providers.docker=true \
  --providers.docker.exposedbydefault=false \
  --entrypoints.web.address=:80 \
  --entrypoints.websecure.address=:443 \
  --certificatesresolvers.letsencrypt.acme.tlschallenge=true \
  --certificatesresolvers.letsencrypt.acme.email=your-email@example.com \
  --certificatesresolvers.letsencrypt.acme.storage=/letsencrypt/acme.json
Replace [email protected] with your actual email address for Let's Encrypt notifications.
This command tells Traefik to:
- Watch Docker for containers (via the Docker socket mounted with
-v) - Listen on ports 80 and 443
- Use the TLS challenge for Let's Encrypt validation
- Store certificates in the mounted volume
Configuring Your Application Container
Instead of running your container with -p 8000:8000, you connect it to the Traefik network and add labels that tell Traefik how to route traffic. Stop your existing container and restart it with Traefik labels:
# Stop the existing container
docker stop ai-api
docker rm ai-api

# Start with Traefik labels
docker run -d \
  --name ai-api \
  --network traefik-network \
  --label "traefik.enable=true" \
  --label "traefik.http.routers.api.rule=Host(\`yourdomain.com\`)" \
  --label "traefik.http.routers.api.entrypoints=websecure" \
  --label "traefik.http.routers.api.tls=true" \
  --label "traefik.http.routers.api.tls.certresolver=letsencrypt" \
  --label "traefik.http.services.api.loadbalancer.server.port=8000" \
  --restart unless-stopped \
  my-ai-classifier:v1.0
Notice:
- No
-p 8000:8000port publishing (Traefik handles external access) --network traefik-networkconnects to Traefik's network, this is important for the two containers to talk to each other
The critical part is the labels which configure routing and SSL. These labels tell Traefik:
traefik.enable=true: Manage this containertraefik.http.routers.api.rule: Route requests foryourdomain.comto this containertraefik.http.routers.api.entrypoints=websecure: Use HTTPS (port 443)traefik.http.routers.api.tls=true: Enable TLStraefik.http.routers.api.tls.certresolver=letsencrypt: Use Let's Encrypt for certificatestraefik.http.services.api.loadbalancer.server.port=8000: Forward to port 8000 inside the container
Note that api is just an identifier for this service, and you can use any name as long as it doesn't conflict with other containers. The port configuration is often optional since Traefik can auto-detect exposed ports, but we include it here for clarity.
How Automatic SSL Works
When you start the container with these labels:
- Traefik detects the new container through the Docker socket
- Reads the labels and creates routing rules
- Sees that TLS is enabled with the Let's Encrypt resolver
- Automatically requests a certificate from Let's Encrypt for
yourdomain.com - Completes the TLS challenge (similar to Certbot's HTTP challenge)
- Installs the certificate
- Begins routing HTTPS traffic to your container
All of this happens automatically within seconds of starting your container. No manual Certbot commands, no Nginx configuration editing.
Automatic Renewal: Traefik monitors certificate expiration dates and automatically renews them before they expire. You don't set up cron jobs or systemd timers; Traefik handles it internally.
HTTP to HTTPS Redirect: To automatically redirect HTTP to HTTPS, add these additional labels when starting your container:
--label "traefik.http.routers.api-http.rule=Host(\`yourdomain.com\`)" \
--label "traefik.http.routers.api-http.entrypoints=web" \
--label "traefik.http.routers.api-http.middlewares=redirect-to-https" \
--label "traefik.http.middlewares.redirect-to-https.redirectscheme.scheme=https"
Trade-offs
Traefik offers significant advantages for container-based deployments. Fully automatic SSL management means you never manually request or renew certificates. The label-based configuration eliminates separate configuration files, and adding new services is as simple as starting a container with the right labels. Native Docker integration makes it scale effortlessly as you add more containers. This approach represents modern cloud-native practices and works particularly well when managing multiple services.
However, these benefits come with trade-offs. The initial setup is more complex than Nginx, requiring understanding of Docker networks, labels, and how Traefik discovers services. The automation also means less transparency; configuration happens "magically" based on labels, which can be harder to debug when things go wrong. For a single container deployment like our API server, Traefik might be overkill. The Nginx and Certbot approach teaches fundamental concepts and provides clear visibility into each step, making it better for learning. Traefik's value becomes apparent when managing multiple services where its automation significantly reduces maintenance overhead.
Extended Reading: The Traefik v3 Docker Compose Guide provides comprehensive setup instructions including dashboard configuration, middleware usage, and advanced routing patterns. The official Traefik documentation covers TLS configuration in depth.
DNS-Based Challenges for Fully Automatic SSL: Beyond the TLS challenge we used above, Traefik supports DNS-based challenges that can be even more powerful, especially with providers like Cloudflare and DuckDNS. With a DNS challenge, you provide Traefik with your domain provider's API token, and it automatically creates DNS records to prove domain ownership. This approach works even if port 80 isn't publicly accessible and can issue wildcard certificates (like
*.yourdomain.com).For Cloudflare, you'd add your API token as an environment variable and change the certificate resolver configuration to use
dnsChallengewithprovider=cloudflare. For DuckDNS, you'd use your DuckDNS token similarly. Once configured, the entire SSL setup becomes fully automated—Traefik handles domain validation, certificate issuance, and renewal without any manual intervention or port requirements. This represents the cutting edge of automated infrastructure management.
Testing Your HTTPS Setup
Now that everything is configured, verify that HTTPS works correctly.
Access Your API via HTTPS:
Open your browser and navigate to https://yourdomain.com. Notice you don't need to specify port 443 because it's the default HTTPS port, just like port 80 is the default for HTTP. You should see:
- A padlock icon in your browser's address bar
- Your API's response (likely the root endpoint message)
- No security warnings
Click the padlock icon to view certificate details. You should see the certificate is issued by "Let's Encrypt" and is valid for your domain.
Test HTTP to HTTPS Redirect:
Try accessing http://yourdomain.com (explicitly using HTTP). You should be automatically redirected to https://yourdomain.com. This ensures users always use the encrypted connection even if they type or bookmark the HTTP version.
# Test with curl, following redirects
curl -L http://yourdomain.com
The -L flag tells curl to follow redirects. You should see your API's response.
Your API is now production-ready with HTTPS. Users can access it at https://yourdomain.com with full encryption, and certificates will renew automatically. Your container continues running unchanged on port 8000, completely unaware of the HTTPS complexity happening in front of it.
Videos:
Exercise
Deploy Your API Server Container on the Cloud
Deploy the container we built in the previous module on a cloud machine to free up the computational resources of your personal computer.
- Connect to a cloud machine of your choice and install the necessary container runtime
- Pull the container image you pushed to container image registry, or upload all source code and build the image on the cloud machine directly
- Run the container and test its functionality
Advanced Challenges (Optional):
- If your cloud machine has a publicly accessible IP address, setup a domain pointing to your API server and enable HTTPS
- Interact with your API server using client program running on another machine (e.g., your personal computer) through the HTTPS-enabled API endpoints